
|

|

ADVICE & FITTING INSTRUCTIONS
Our products are all designed as Easy Fit Systems.
That does NOT compromise the design integrity of the Playseat Challenge.
With minimal components. Created to be simplistic & deliver the maximum in grip capabilities by only 2 fixings.
If however, on opening your order, you determine the system might be a little bit much for you to fit PLEASE ASK
someone else who has the skills, experience and aptitude to fit it.
"Basically - DO NOT attempt unless supervised"
|
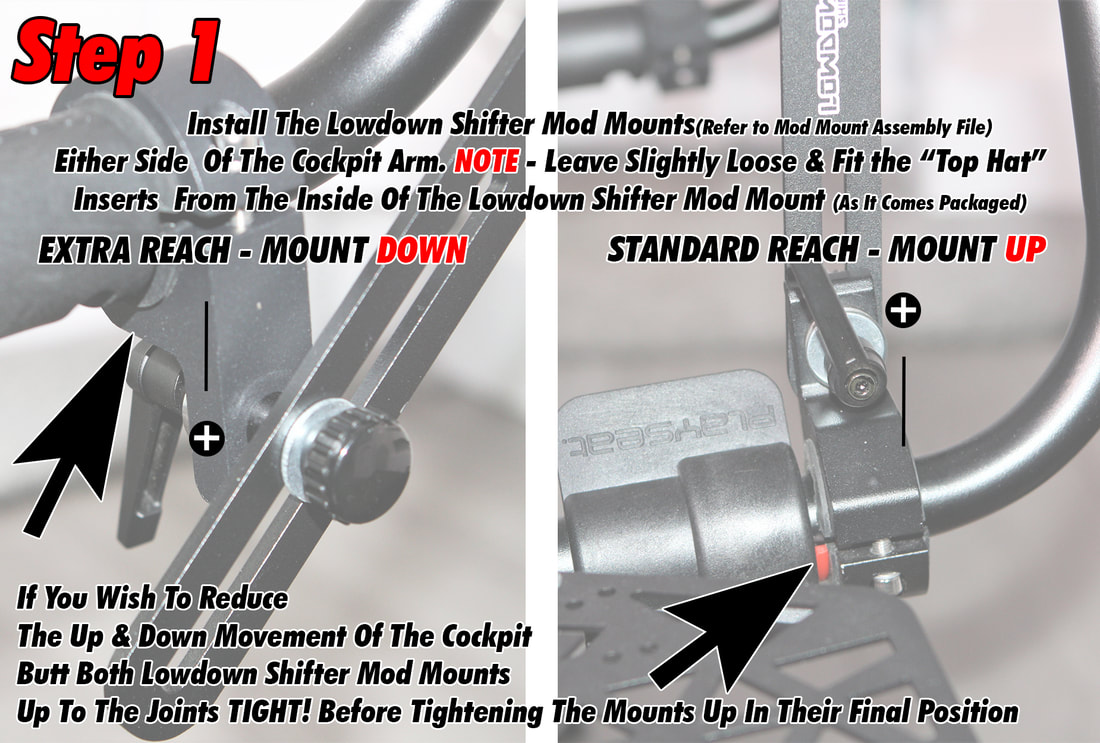
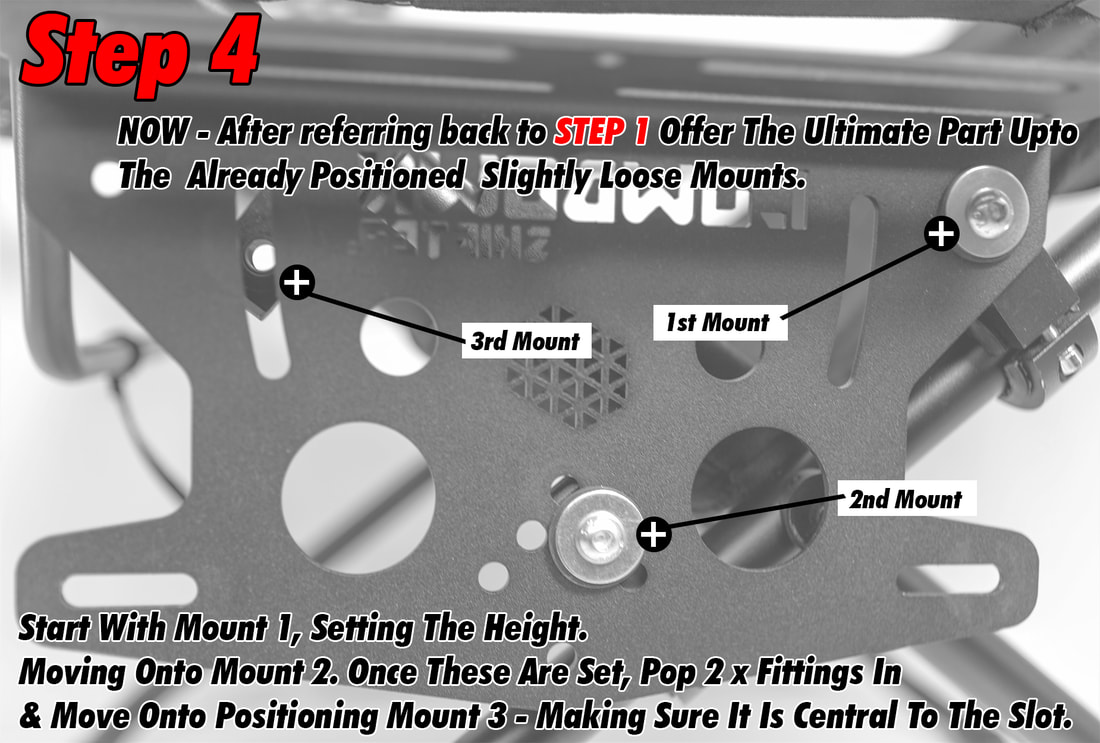
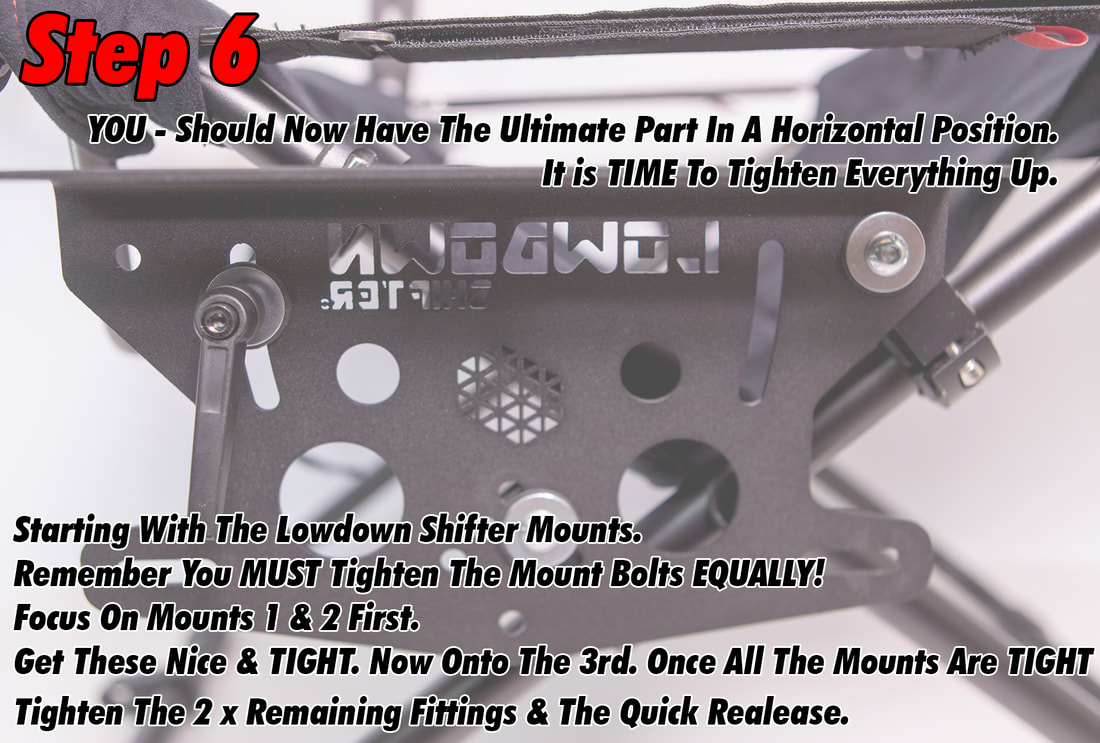
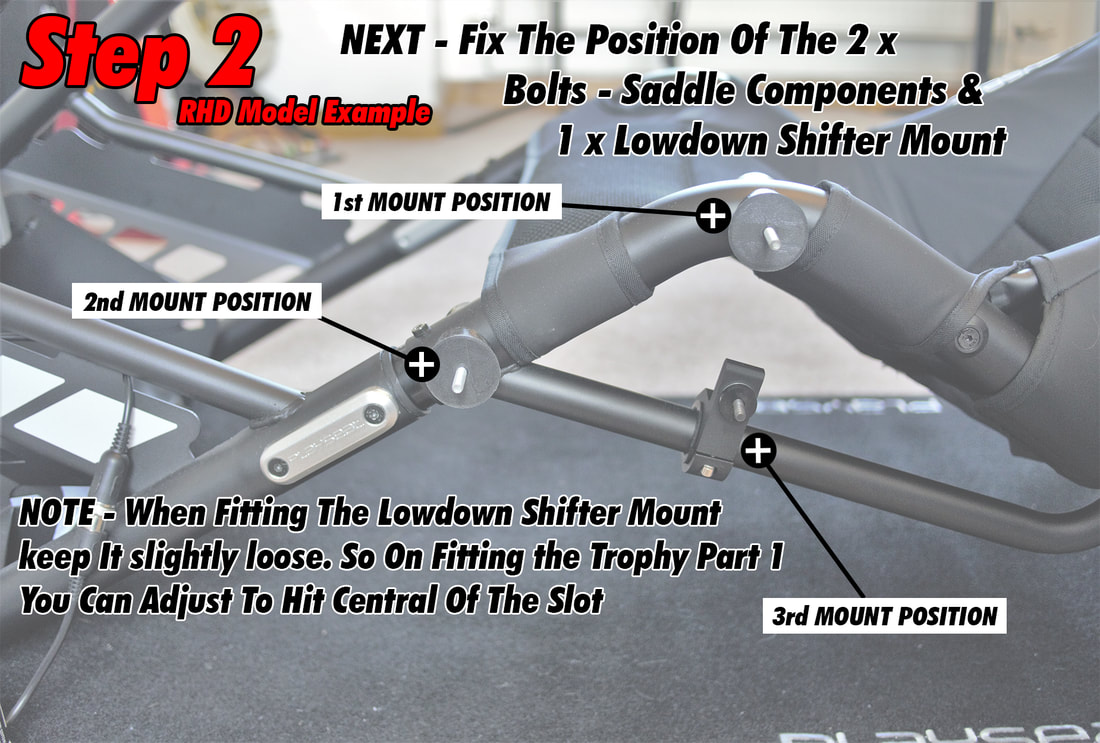
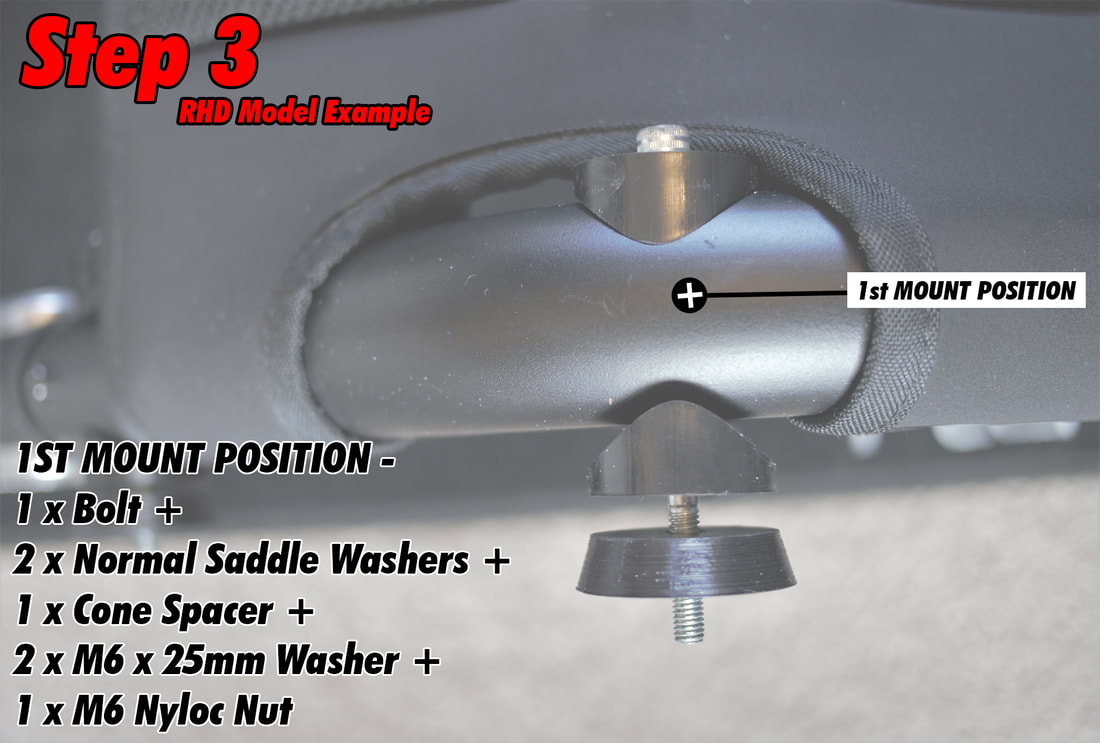
You MUST turn your bolts EQUALLY when installing the Lowdown Shifter Mount. For example: 3 turns on 1 bolt THEN 3 turns on 2nd bolt. And so on If you do NOT turn the bolts EQUALLY you run the risk of ripping/pulling out the opposite thread This is also imperative when removing the Lowdown Shifter MOUNT |
ALWAYS start turning a bolt into a thread with your FINGERS Moving then onto the Allan Key/Hex Key to tighten EQUALLY When using your fingers you're able to feel BOTH bolt & thread are mechanically working correctly This will STOP cross threading & is the best method in initial application! |

|
1 x 10.9 HEX/ALLAN KEY
(1 Included Just For The Mount) |
1 x 13mm SPANNER/WRENCH
1 x 10mm SPANNER/WRENCH (Not Included) |
Small QUICK RELEASE CLAMP
(Optional) |
First & foremost you are going to need the Install Gear as advised
Consisting of:
- 1 x 13mm spanner/wrench
-1 x 10mm spanner/wrench
- 1 x 10.9 hex key or Allan key
"All the fittings necessary for EVERY install are enclosed & complimentary"
OPTIONAL
It is not a necessity, as you can start threading the bolts using just your FINGERS.
However, you can use a small quick release clamp if you wish to improve dexterity.
Though it must have at least a 100mm mouth.
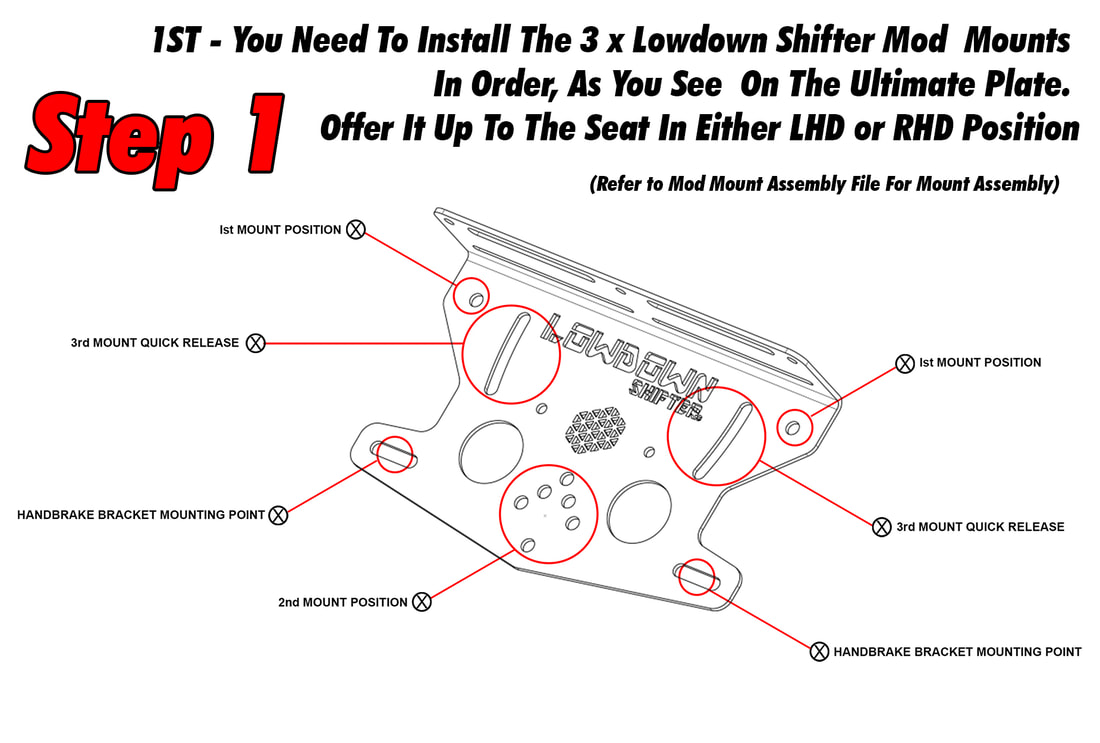
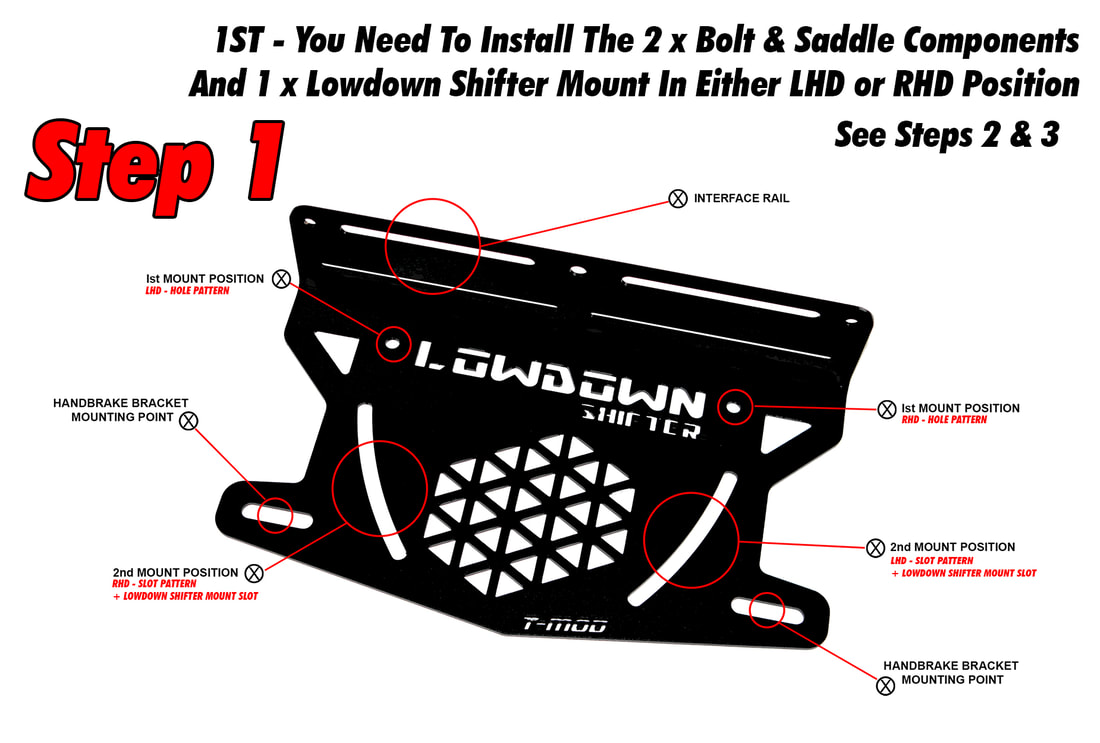
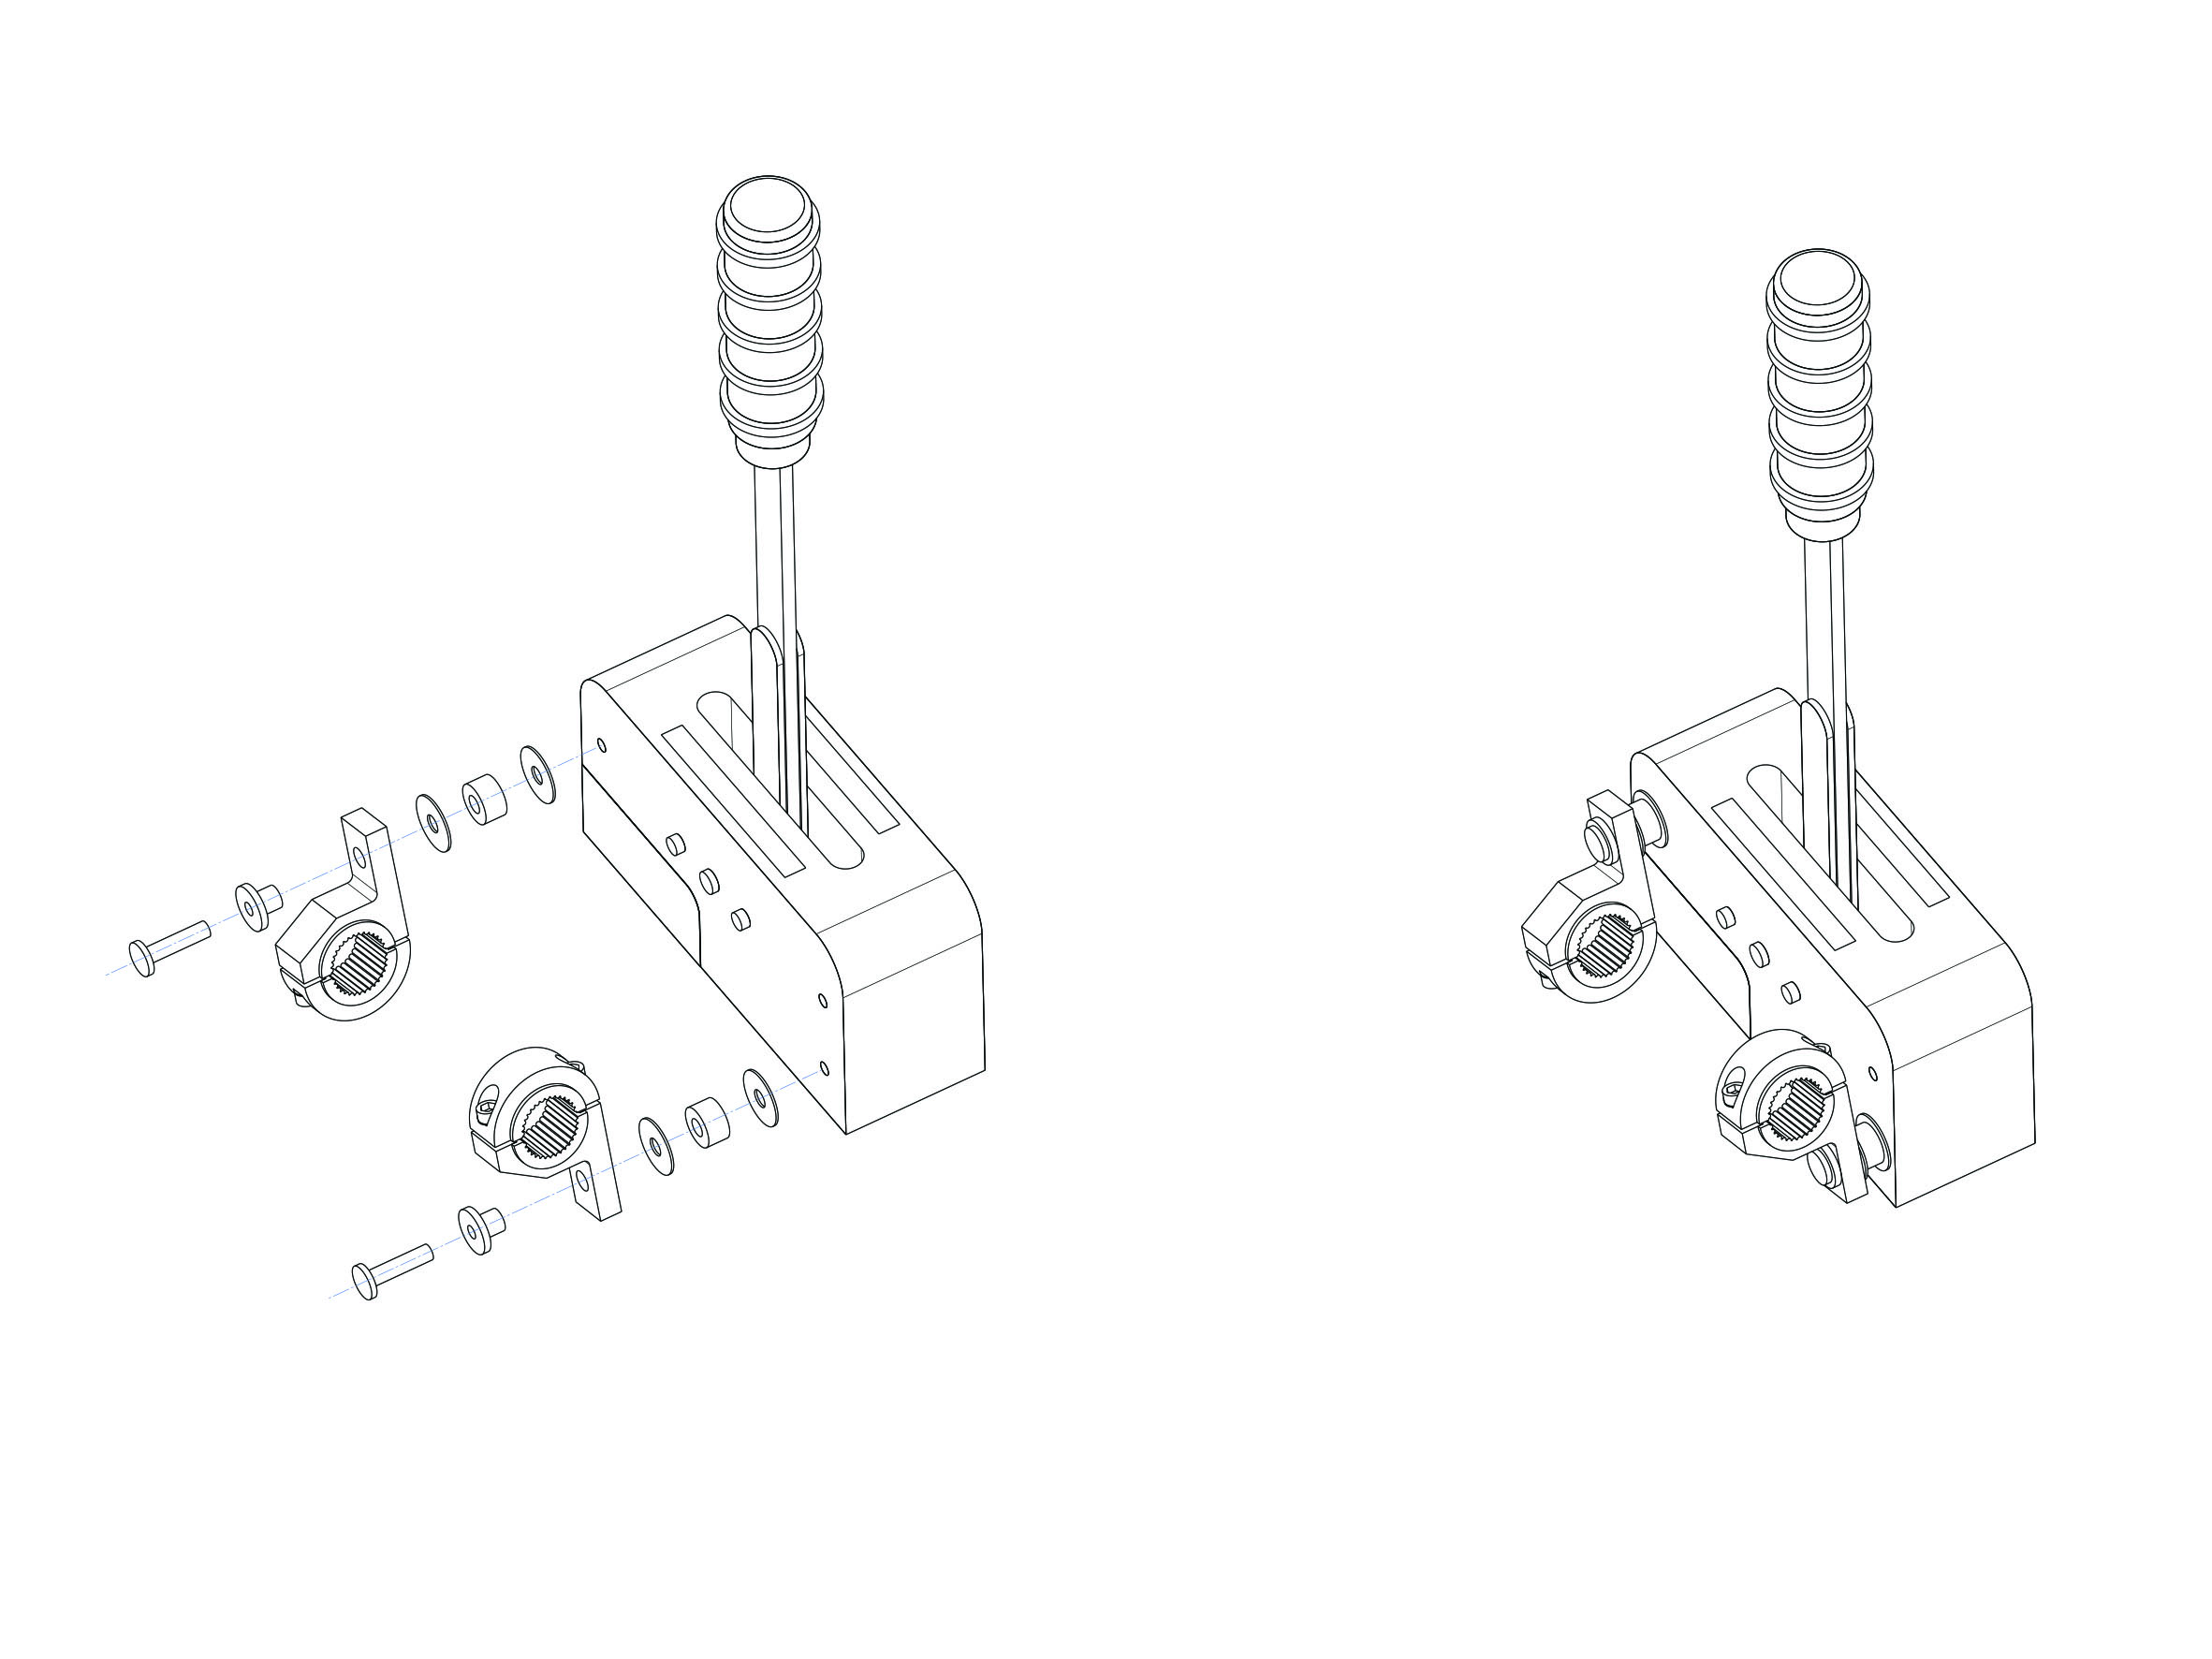
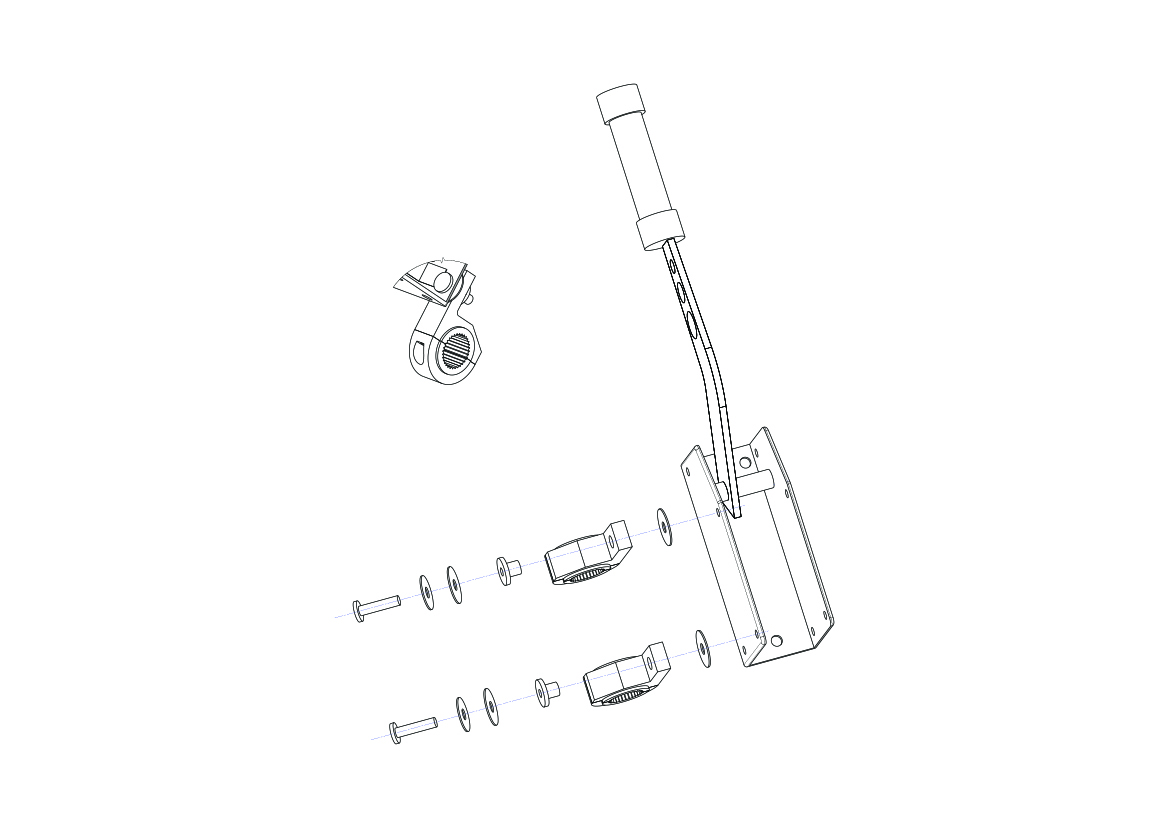
FITTING OF THE LOWDOWN SHIFTER MOD MOUNT
In respect to the smaller bolts needed for the fitting of the mount system, you will find these, complete with the suitable sized hex or Allan key for fitment enclosed in a resealable clear bag.
THE MOUNTS ARE PRE-BUILT USING THE MOST POPULAR RUBBER GRIP COMBINATION WHEN PACKAGED
Consisting of:
- 1 x 13mm spanner/wrench
-1 x 10mm spanner/wrench
- 1 x 10.9 hex key or Allan key
"All the fittings necessary for EVERY install are enclosed & complimentary"
OPTIONAL
It is not a necessity, as you can start threading the bolts using just your FINGERS.
However, you can use a small quick release clamp if you wish to improve dexterity.
Though it must have at least a 100mm mouth.
FITTING OF THE LOWDOWN SHIFTER MOD MOUNT
In respect to the smaller bolts needed for the fitting of the mount system, you will find these, complete with the suitable sized hex or Allan key for fitment enclosed in a resealable clear bag.
THE MOUNTS ARE PRE-BUILT USING THE MOST POPULAR RUBBER GRIP COMBINATION WHEN PACKAGED
THE Install Guide Video's
YOU can download any of these Lowdown Shifter Mod Mount install video's
|
|
|
|
|
|
|

| |||
REMINDER - It's important to TIGHTEN the Lowdown Shifter Mod Mount Bolts - 'EQUALLY'!
‘HARD or SOFT INSTALL'
What does that even mean? Options for one, let me quickly explain.
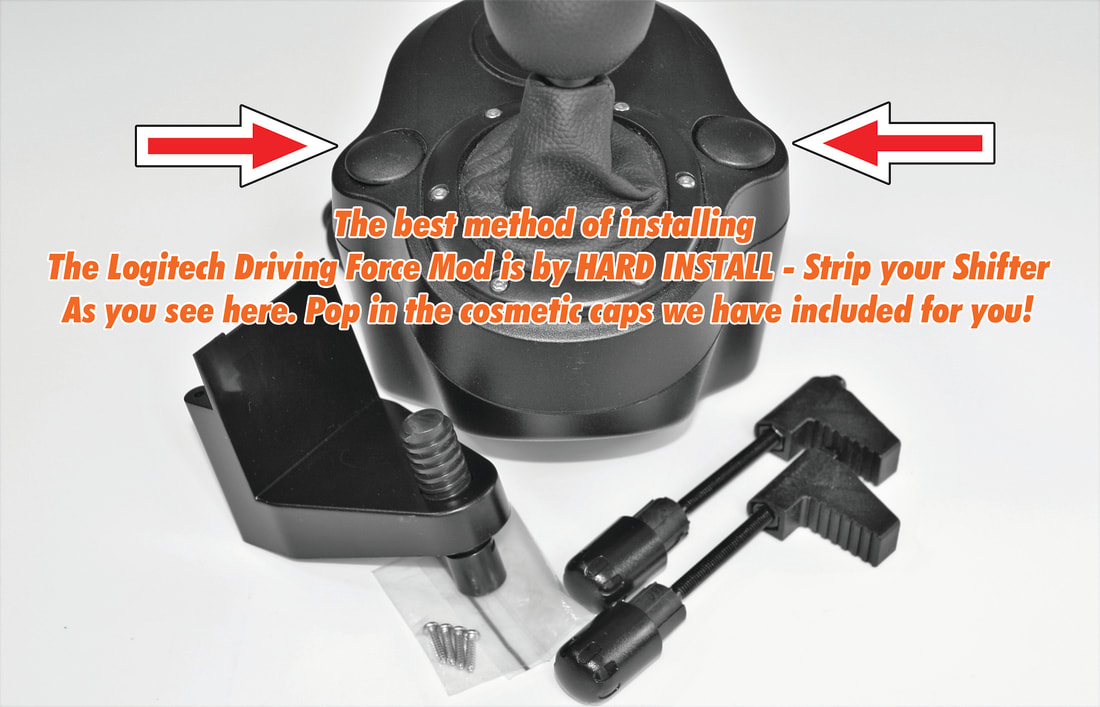
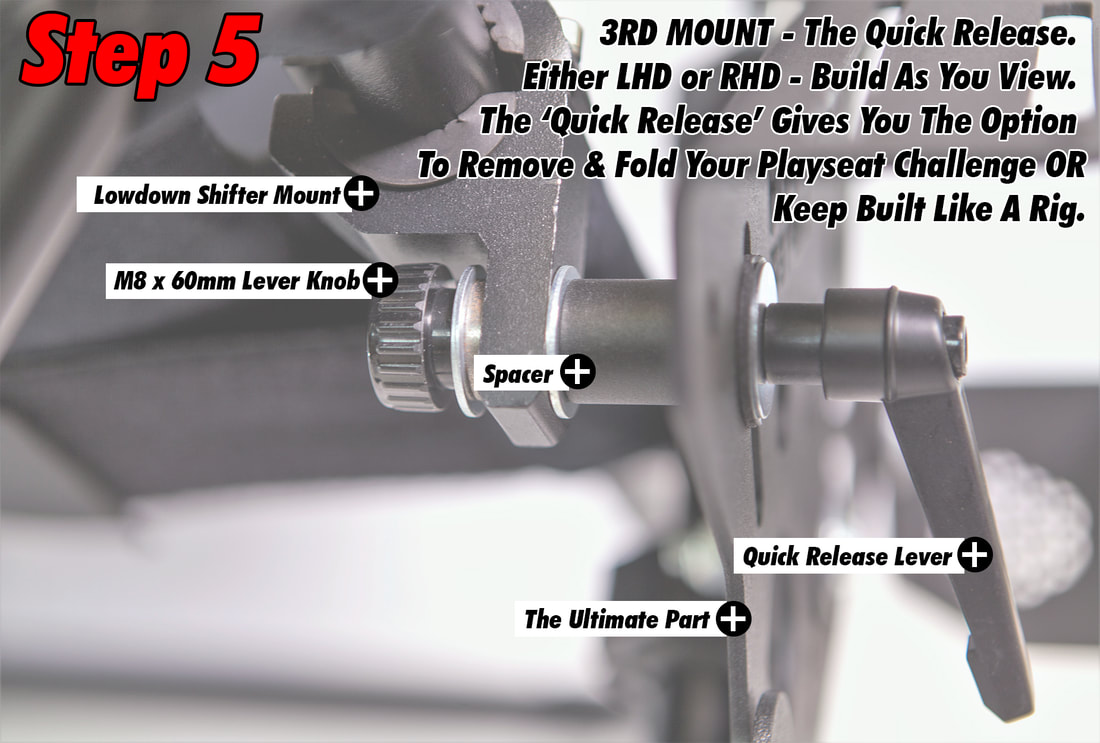
HARD INSTALL – Driving Sim Mod is connected directly to our Mod Interface System by fittings provided.
SOFT INSTALL – Driving Sim Mod is connected to our Mod Interface System
Via the Driving Sim Mods provided clamp
ALL of our Mod Interface Systems are ‘HARD INSTALL' but deliver both mounting options.
Some Driving Sim Mods, like the Logitech G29 for example
Comes with the manufacturers clamping system already fitted.
A manufactured 'SOFT INSTALL'.
What does that even mean? Options for one, let me quickly explain.
HARD INSTALL – Driving Sim Mod is connected directly to our Mod Interface System by fittings provided.
SOFT INSTALL – Driving Sim Mod is connected to our Mod Interface System
Via the Driving Sim Mods provided clamp
ALL of our Mod Interface Systems are ‘HARD INSTALL' but deliver both mounting options.
Some Driving Sim Mods, like the Logitech G29 for example
Comes with the manufacturers clamping system already fitted.
A manufactured 'SOFT INSTALL'.
Though, unlike other on the market, it can be easily removed and changed into a HARD INSTALL,
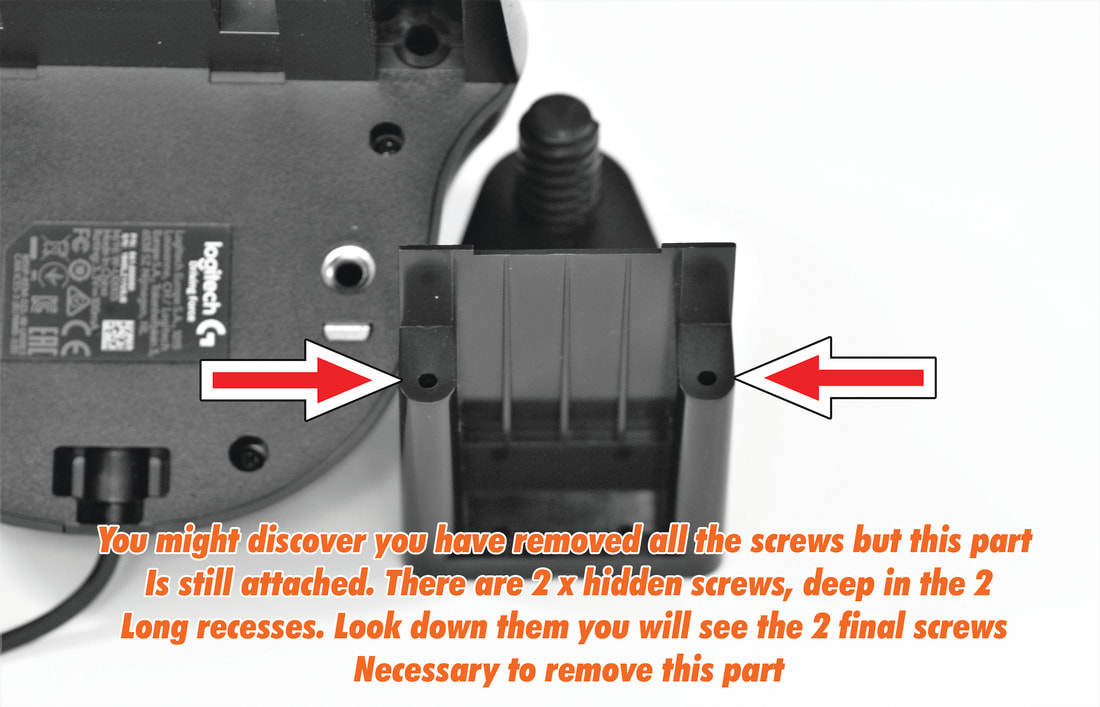
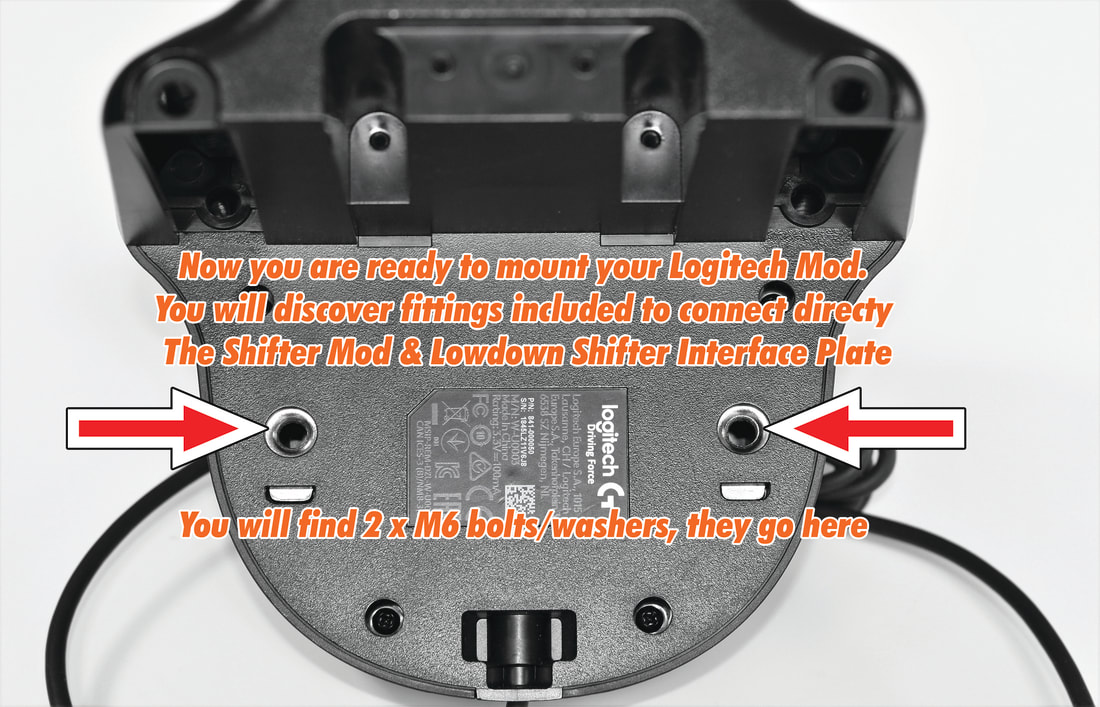
FOR EXAMPLE: On turning over the Logitech G29 Driving Sim Mod and looking underneath, you will discover the manufactured ‘Hard Install’ M6 threaded inserts. This applies to the majority of add on Driving Simulator Mods on the market.
FOR EXAMPLE: On turning over the Logitech G29 Driving Sim Mod and looking underneath, you will discover the manufactured ‘Hard Install’ M6 threaded inserts. This applies to the majority of add on Driving Simulator Mods on the market.
|
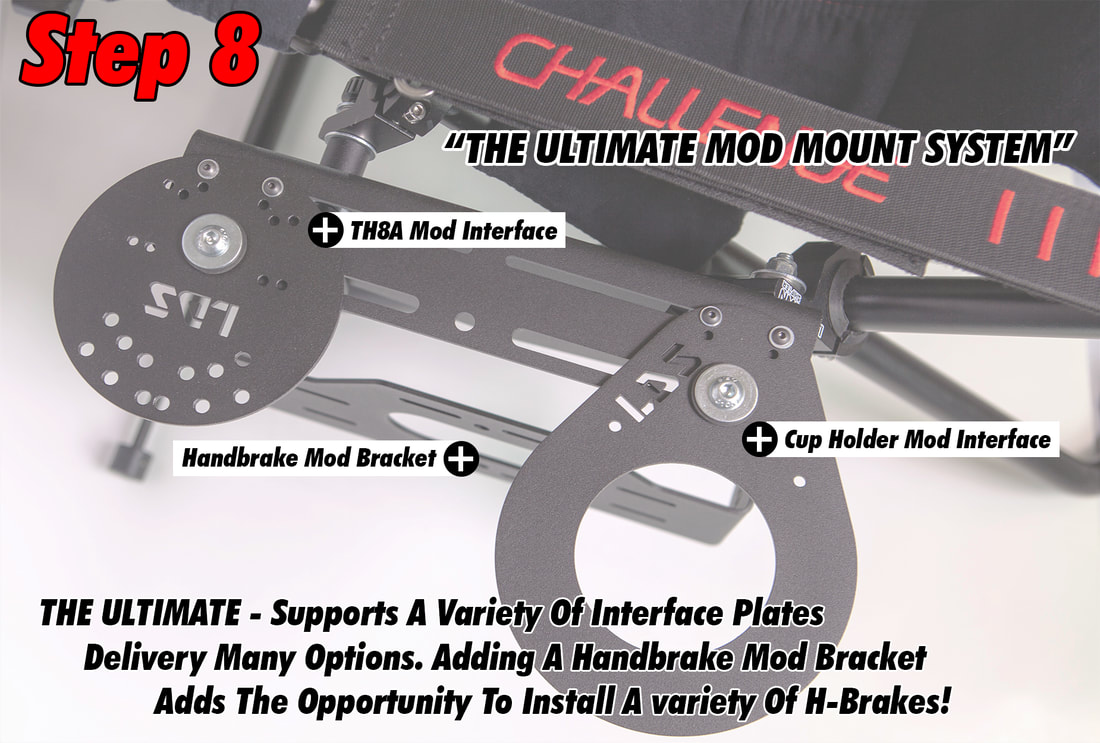
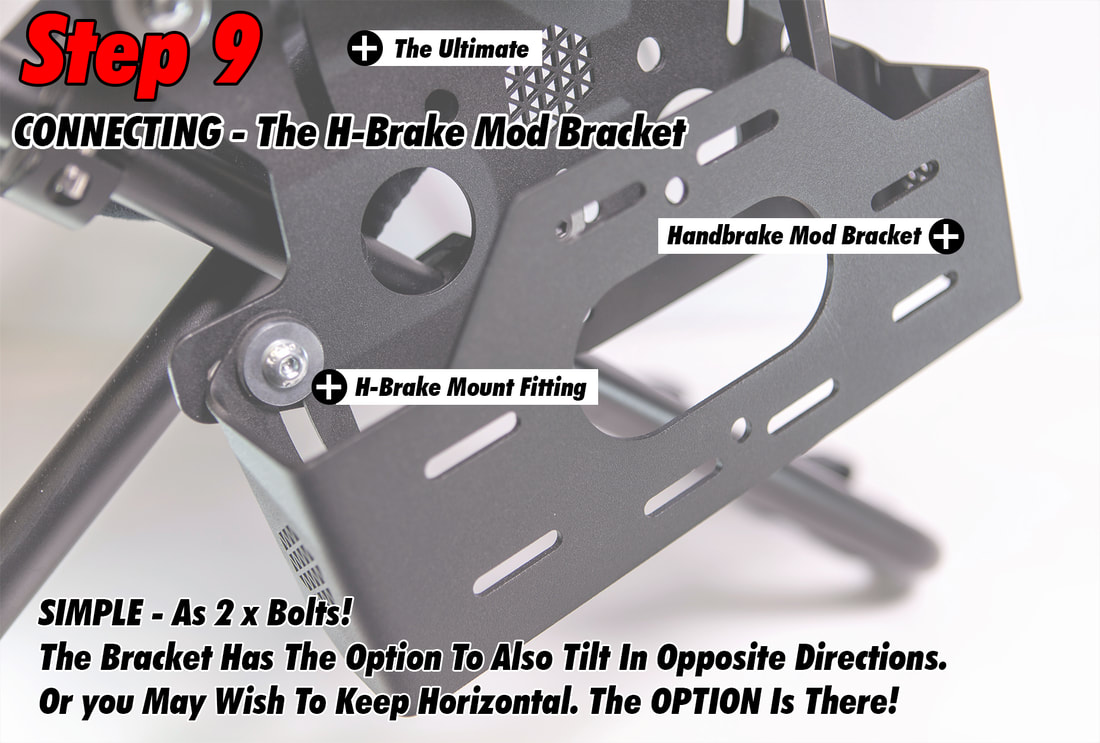
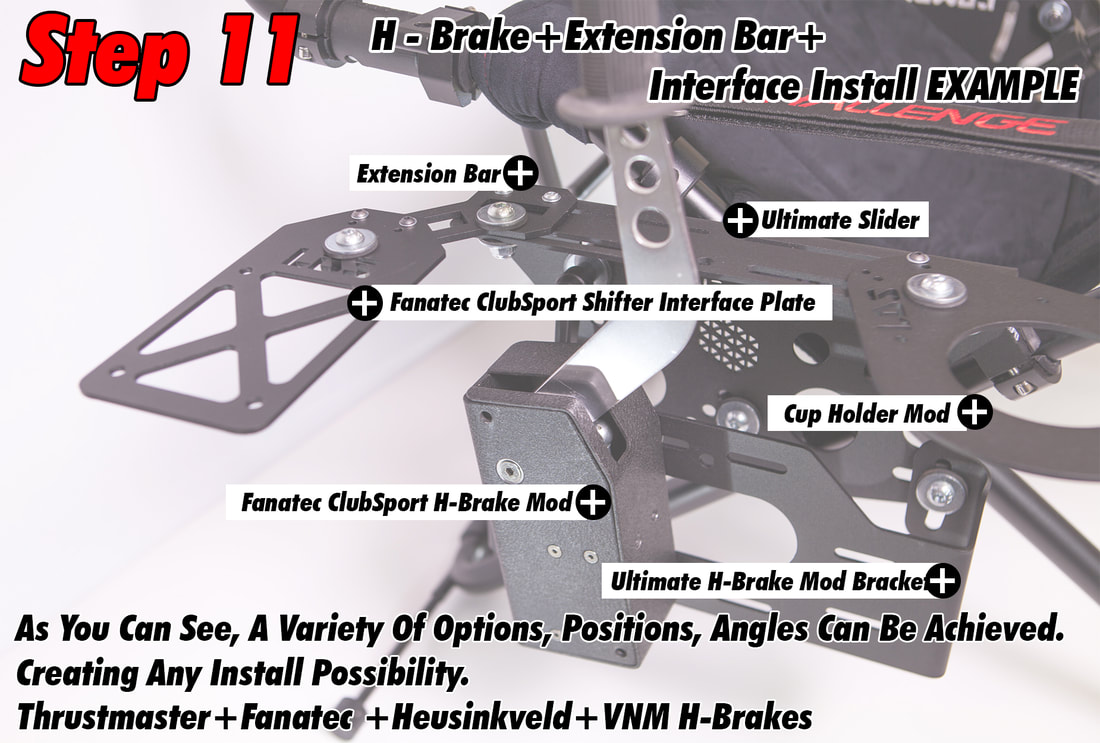
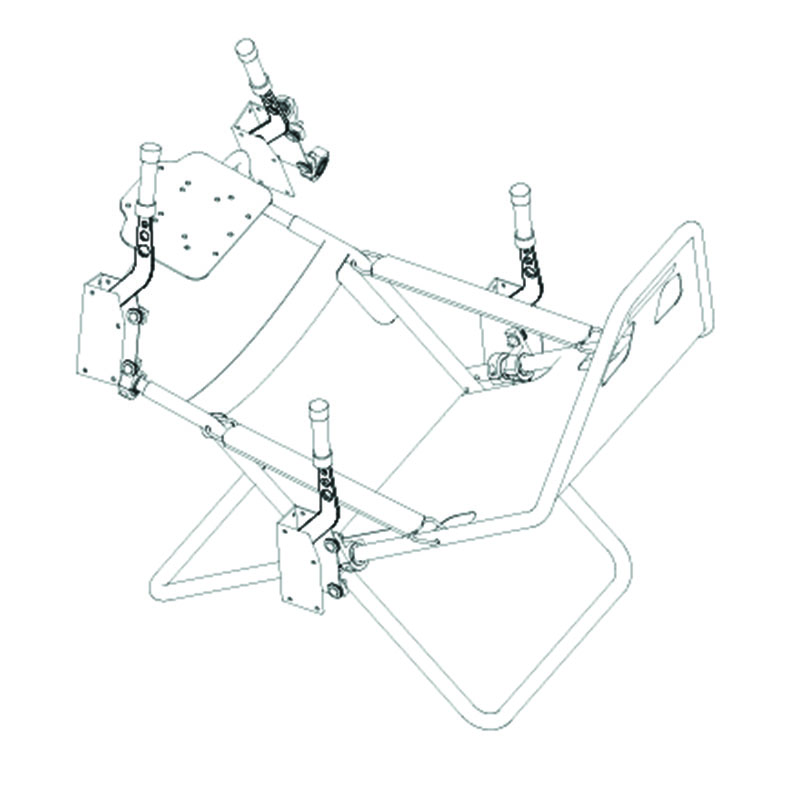
MOUNT COMBINATION
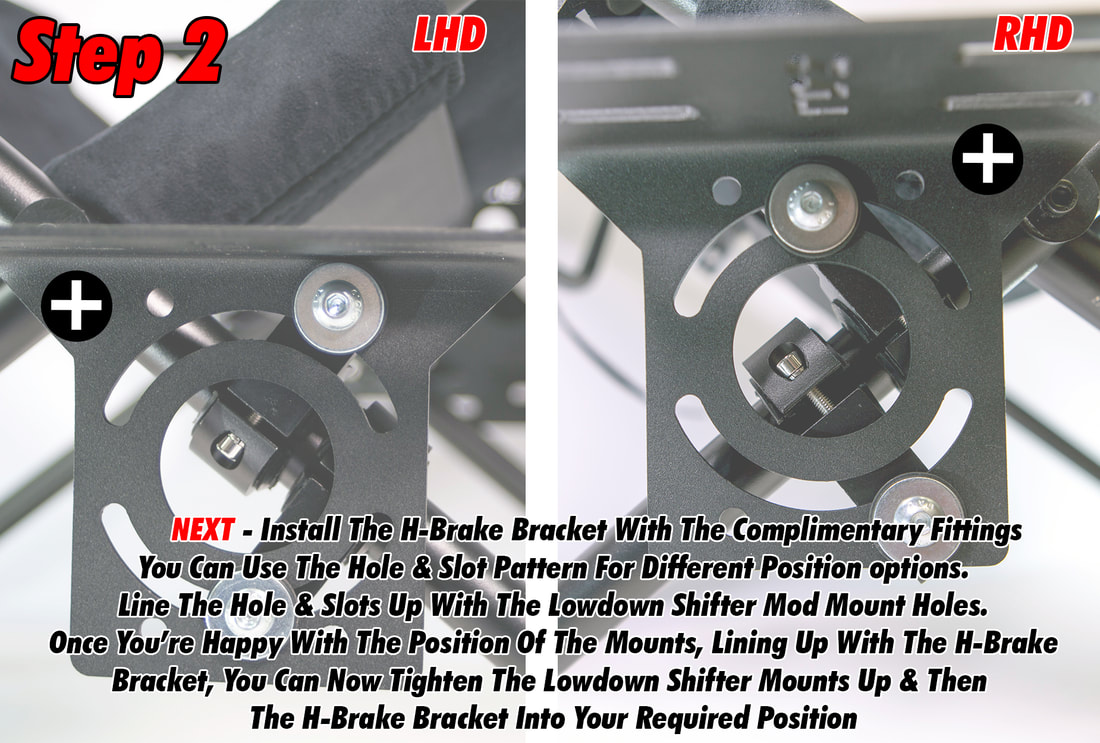
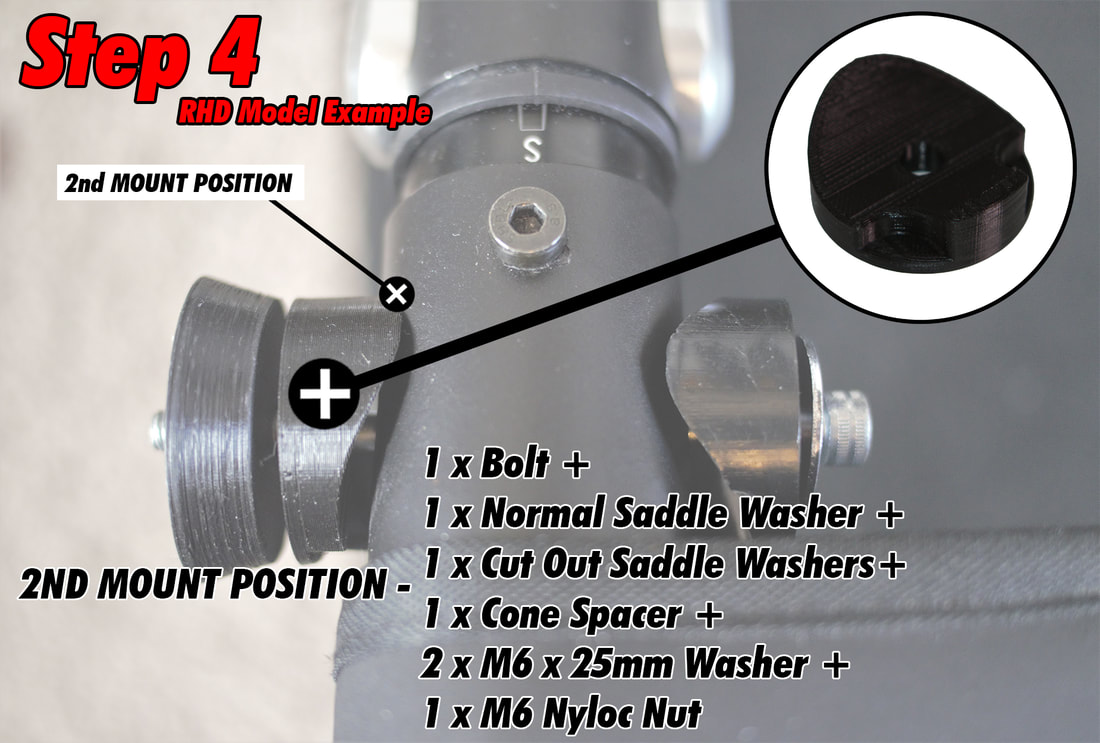
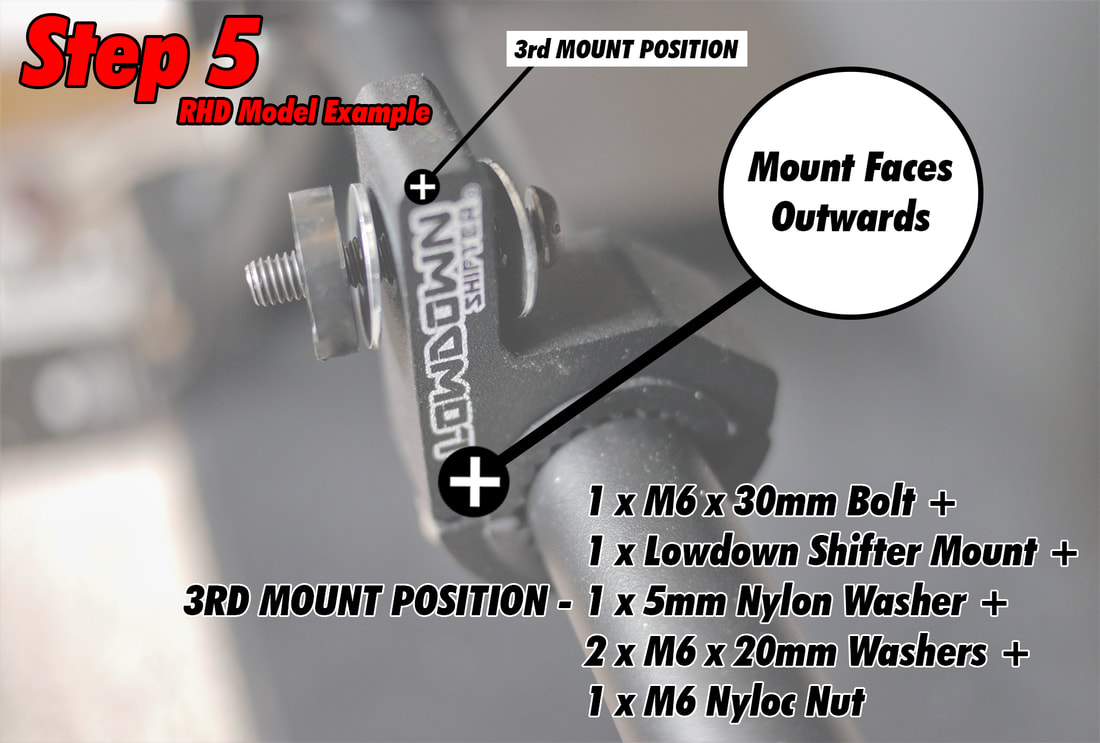
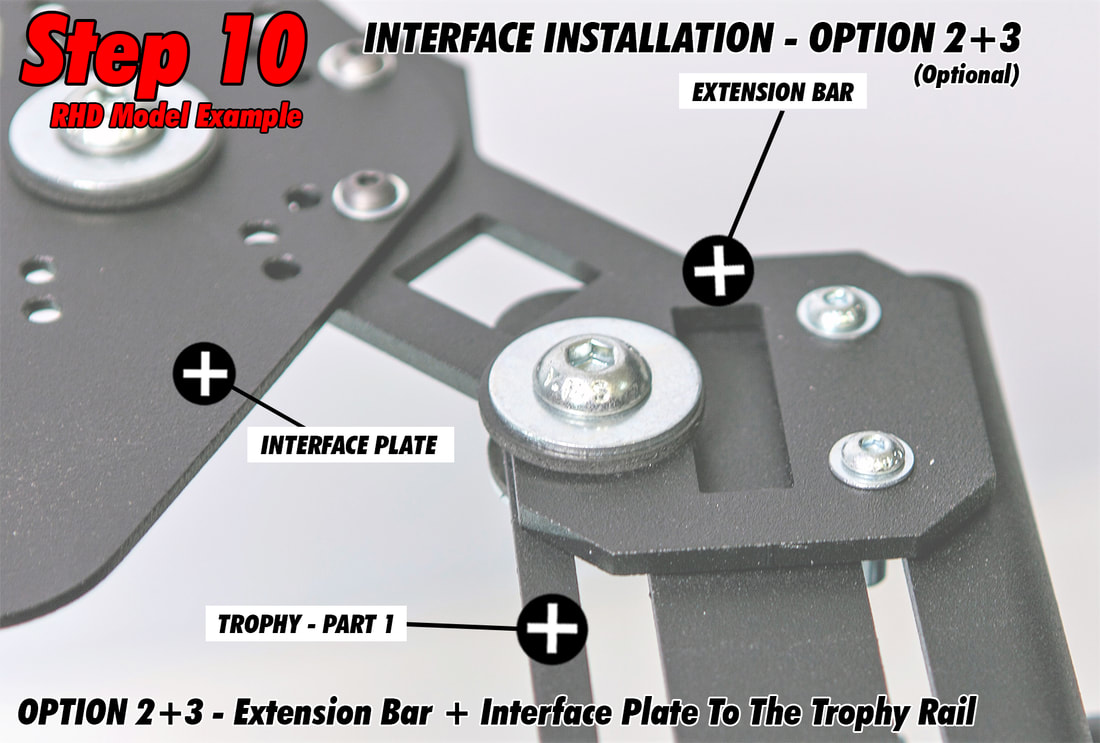
STEP- 1 - Mount the Lowdown Shifter mount in the decided position STEP - 2 - Next the MOD INTERFACE PLATE specific to your Mod STEP - 3 - Apply and fix your Mod to the INTERFACE PLATE FITTING - BREAKDOWN 1. The key to success with the Lowdown Shifter Mount System is 'TIGHT' but NOT 'OVER TIGHT'. 2. Please be careful NOT to 'Cross Thread The Mount Hex Head Bolts' in the aluminium mount! Steel is harder than aluminium. Keep the bolt straight, square and true. We advise to start this process always by finger Then once the bolt is correctly established Into the thread, move on to tools. It is IMPERATIVE you turn the bolts EQUALLY as you fasten up the bolts into the mount. |
This is how this kind of mechanical mount works.
EQUALLY - Example - If you turn the bolt 3 times, whatever the range of travel, you MUST turn the opposite bolt the EQUAL amount of turns. So both components are always tightened parallel to each other. The same instructions apply on the mounts REMOVAL. PARALLEL - Easily identified by both moving mount components working in unison and an EQUALLY maintained gap. At the point of full resistance, both components of the mount should NOT be touching, As you start this stage, keep the gap between the mount components level/equal. Keep PRESSURE on the mount TOP and BASE components, squeezing them together, making sure they are constantly held in line. You can either use your hands if you have a good reasonable grip OR we also advise the use of a suitably sized QUICK RELEASE CLAMP. - THOUGH AS PREVIOUSLY STATED - IT IS NOT A NECESSITY - |

The written instructions can be a bit long winded
You can download simpler illustrations here
You can download simpler illustrations here
| RHD - RIGHT HAND DRIVE MOD MOUNT ASSEMBLY |
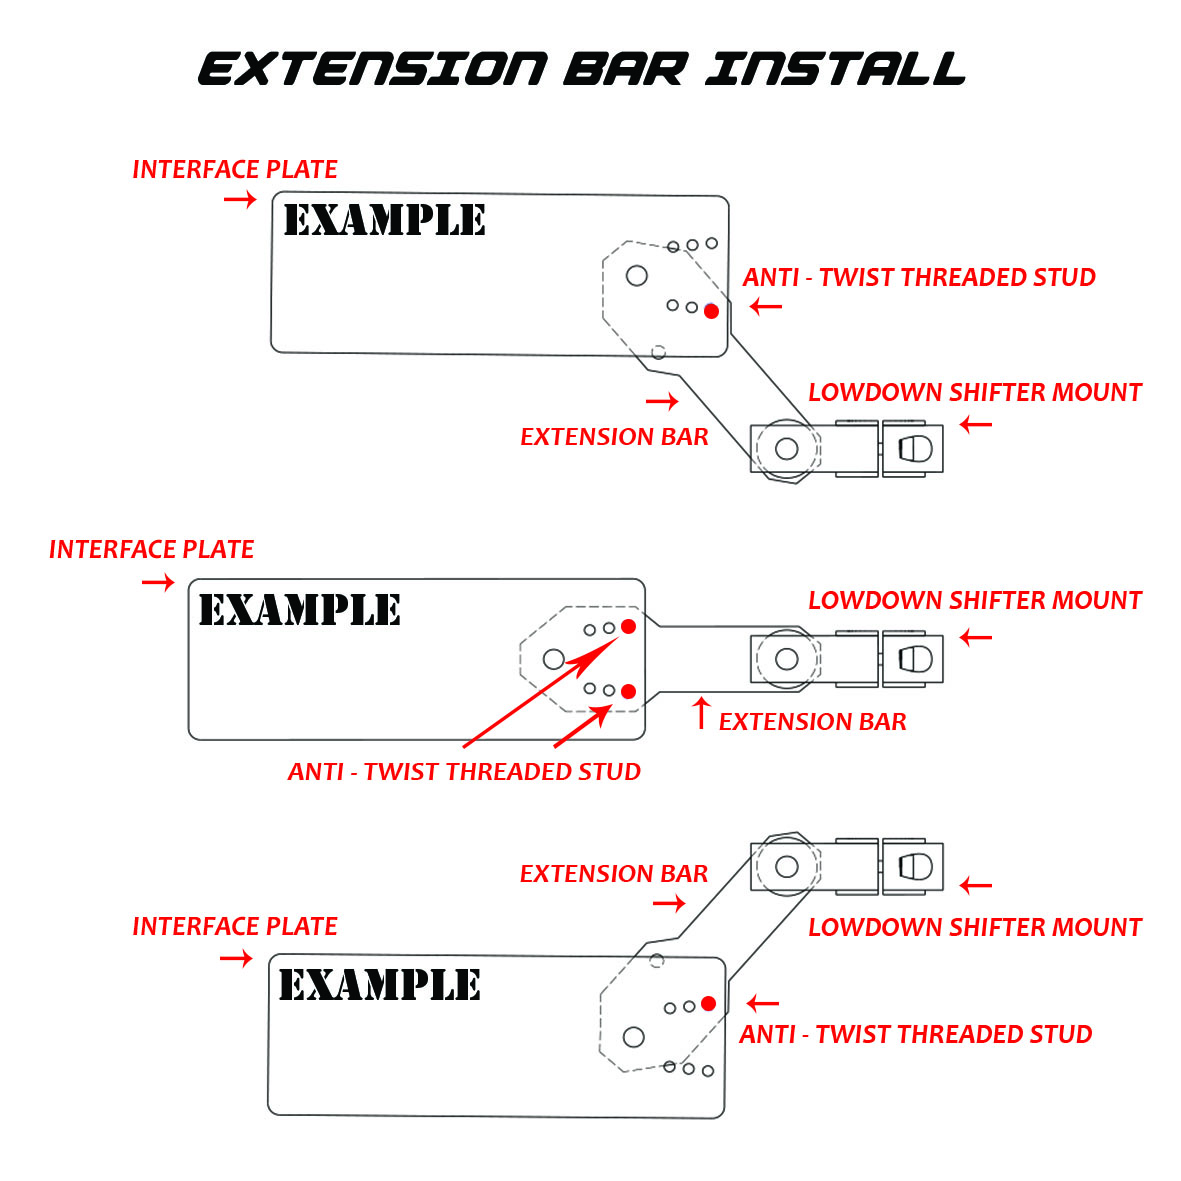
| EXTENSION BAR INSTALL OPTION 3-4.jpg |
| ||||
|

| ||
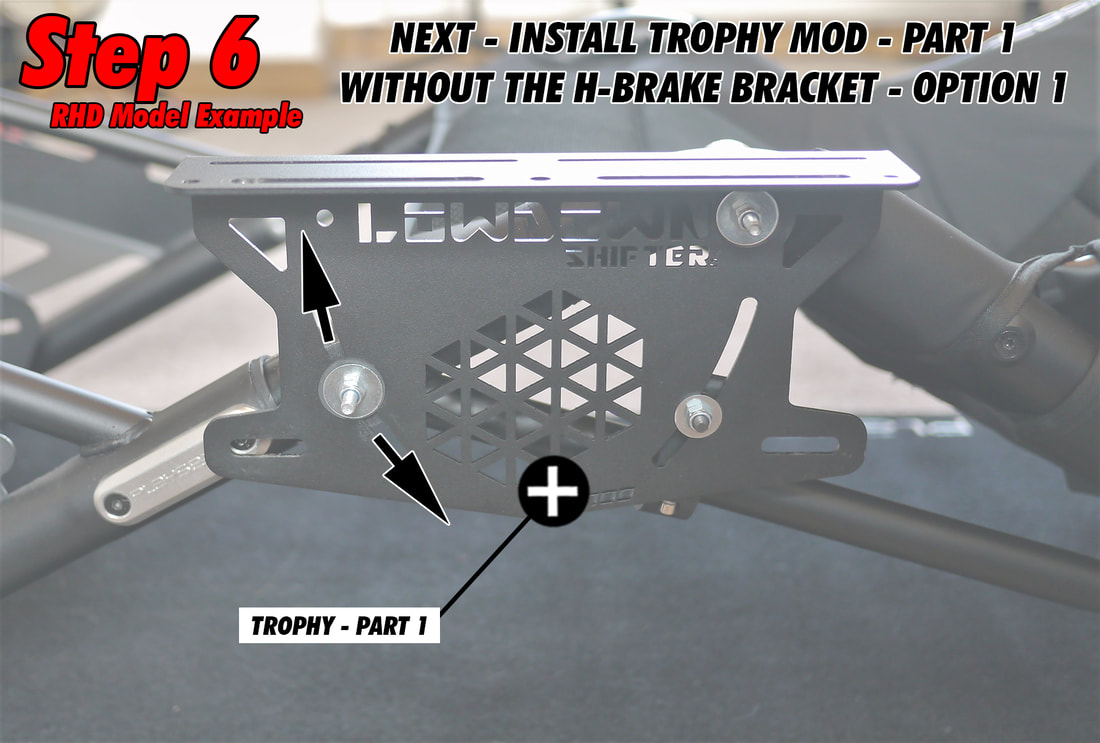
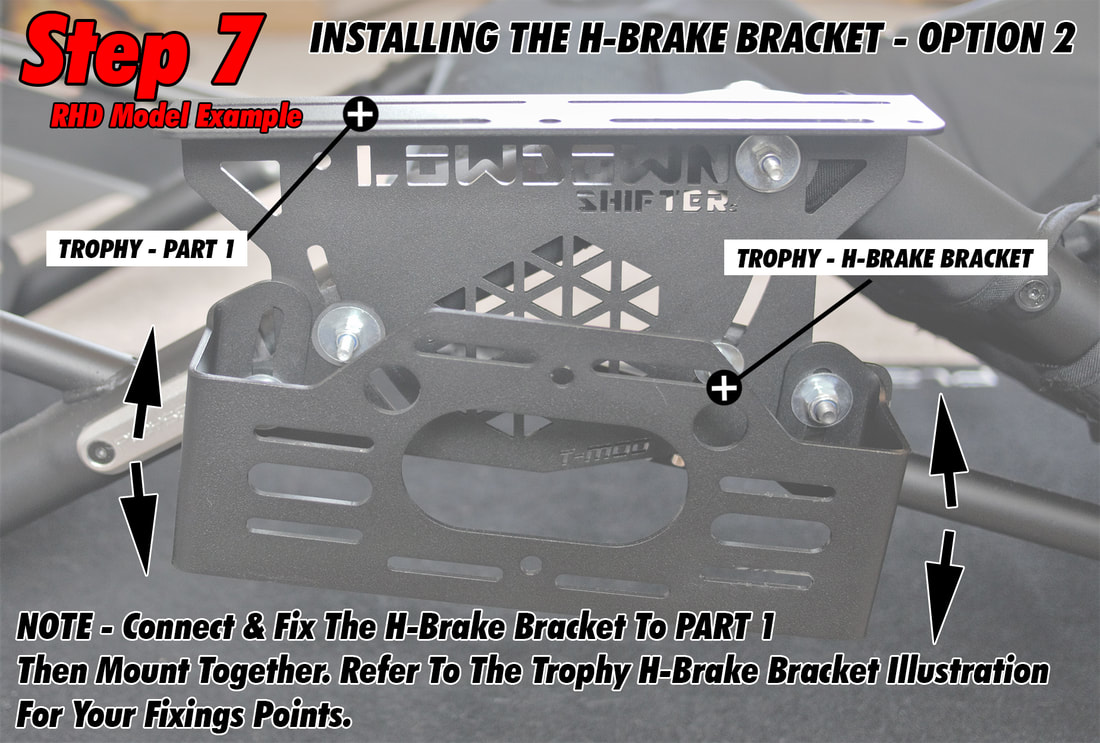
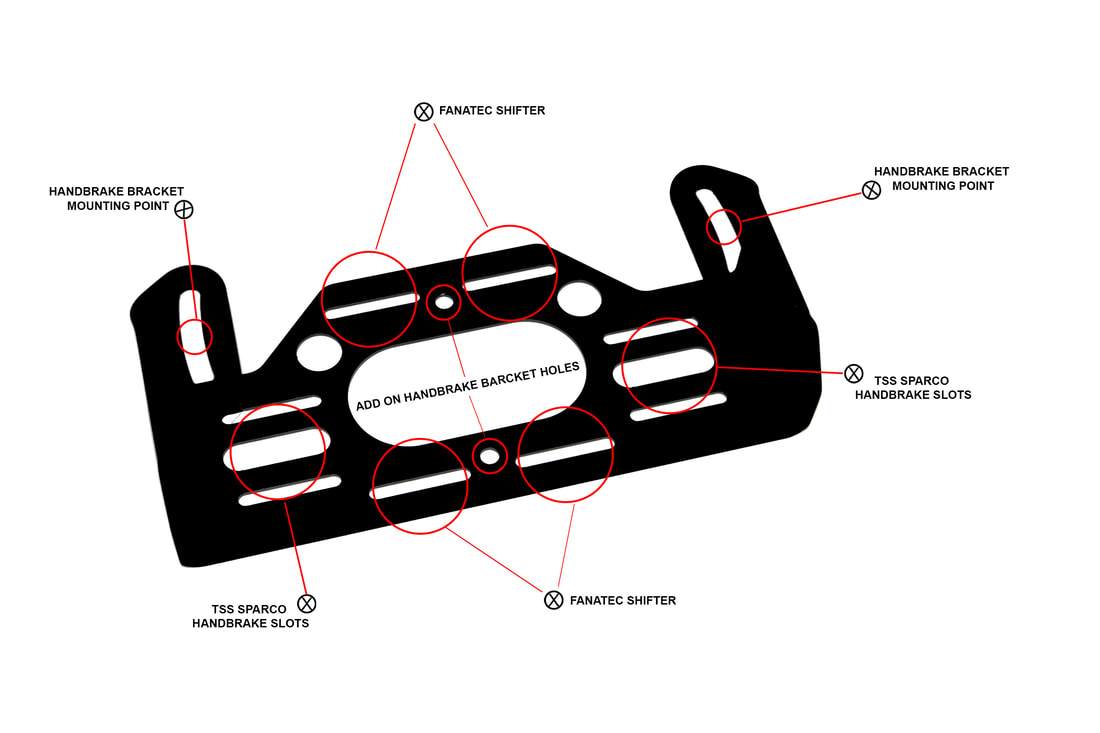
| TSS SPARCO HANDBRAKE ASSEMBLY.jpg |
| FANATEC CLUBSPORT HANDBRAKE ASSEMBLY.jpg |
| FANATEC CLUBSPORT HANDBRAKE INSTALL ILLUSTRATION 1.jpg |
| FANATEC CLUBSPORT HANDBRAKE INSTALL ILLUSTRATION 2.jpg |


THE LEFT AND RIGHT HAND DRIVE RULE
(Reminder - before you place your order)
You purchase either a LEFT HAND DRIVE VEHICLE
OR you purchase a RIGHT HAND DRIVE VEHICLE
"DEPENDENT on the designed road system of your country"
- LEFT HAND DRIVE - LHD - Shifter to your RIGHT SIDE
- RIGHT HAND DRIVE - RHD - Shifter to your LEFT SIDE
(Reminder - before you place your order)
You purchase either a LEFT HAND DRIVE VEHICLE
OR you purchase a RIGHT HAND DRIVE VEHICLE
"DEPENDENT on the designed road system of your country"
- LEFT HAND DRIVE - LHD - Shifter to your RIGHT SIDE
- RIGHT HAND DRIVE - RHD - Shifter to your LEFT SIDE
|
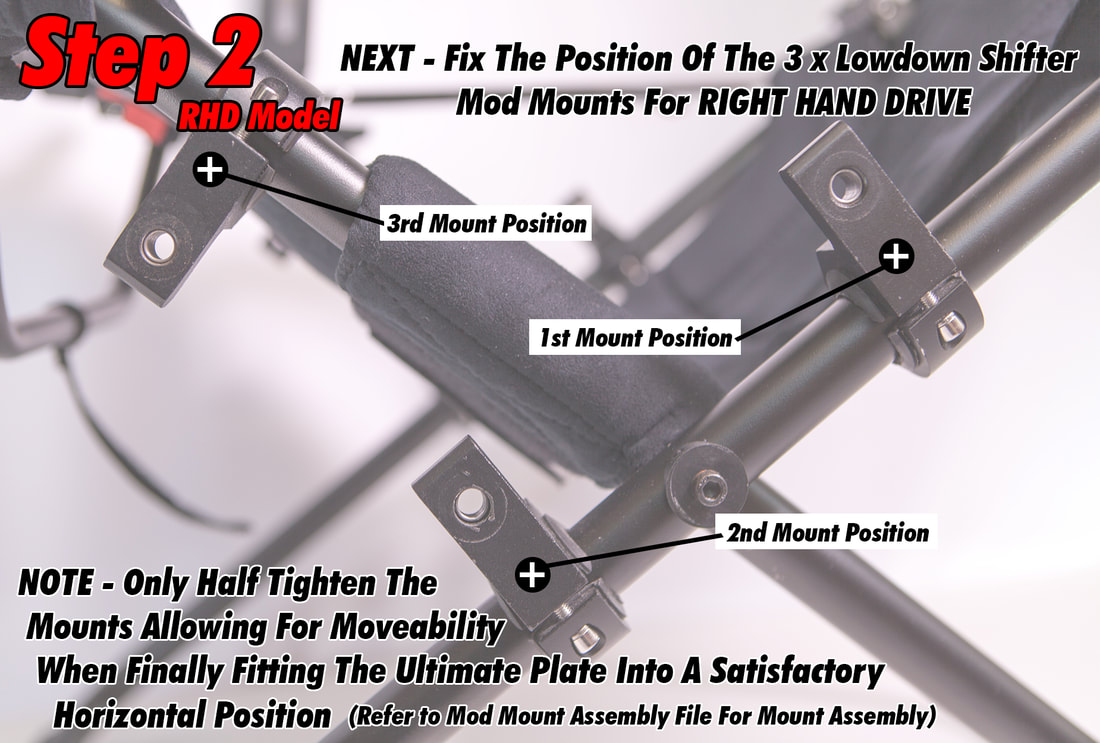
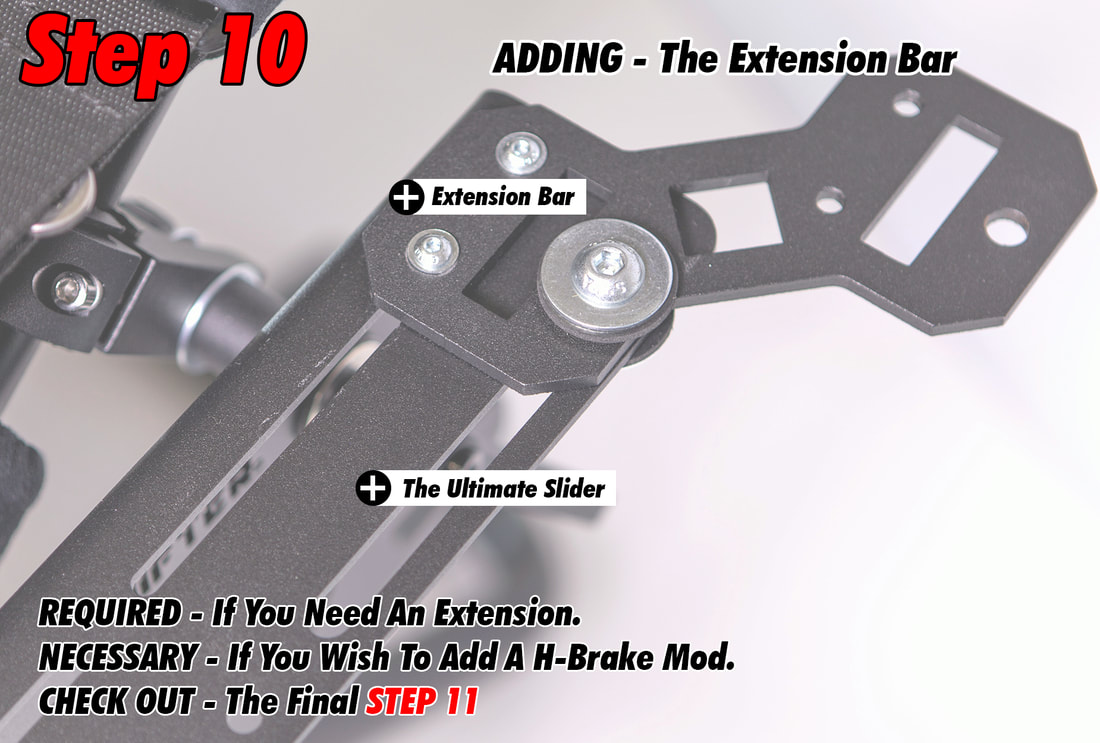
The LEFT HAND DRIVE Bundle in the Phase 2 Range has 1 x extra component compared to the RIGHT HAND DRIVE Lowdown Shifter Mod Interface System.
The use of an EXTENSION BAR. This enables, when mounted to any of our Interfaces, a small extension. Angled extension can also be achieved. Specifically designed to allow for any extra clearance that might be necessary. For example: In respect to the Playseat Challenge, when mounting in the LHD position - Shifter to your RIGHT hand side. There is a cockpit lock paddle operation next to The Recommended Mounting Position |
Unlike the opposite side, the RHD - RIGHT hand drive position. Which is free from any obstruction when mounted in the same
horizontal position. Please refer to your specific Mod Mount Assembly Illustration for more information and visual reference "You don't have to fit the extension bar if you wish to mount your Mod in another place. For example: Both front diagonal legs can also be used to place your Mod if want a much closer reach OR for a tilted angled position" |
LHD - EXTENSION BAR FITTING OPTIONS

EASY FIT - PLUG & PLAY

What does AMBIDEXTROUS even mean?
Simple - It is both sided.
LEFT & RIGHT HAND DRIVE/SIDED
Any product that is ambidextrous, unless specified, does not require the use of an Extension Bar. As you would in the LHD Model.
Simple - It is both sided.
LEFT & RIGHT HAND DRIVE/SIDED
Any product that is ambidextrous, unless specified, does not require the use of an Extension Bar. As you would in the LHD Model.

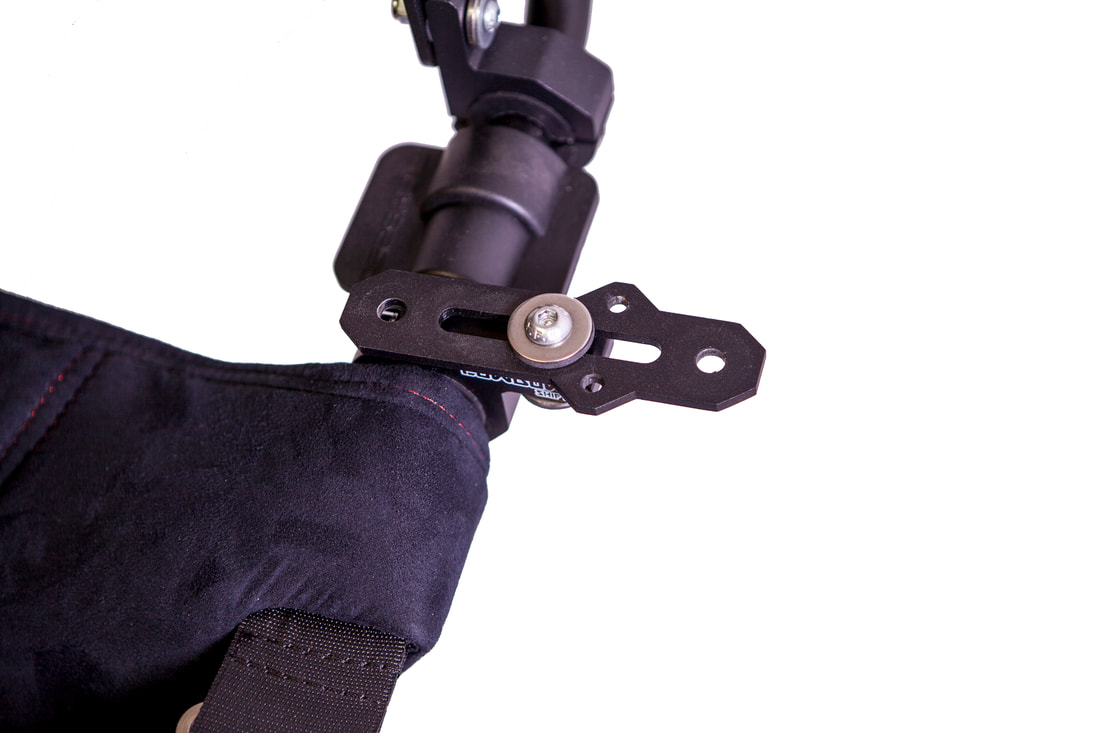
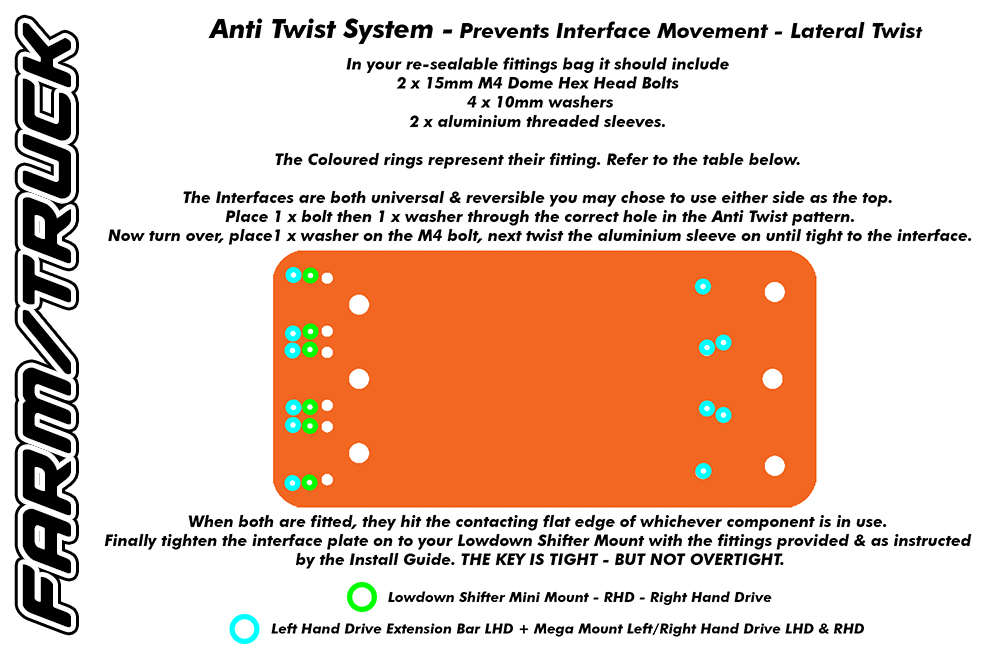
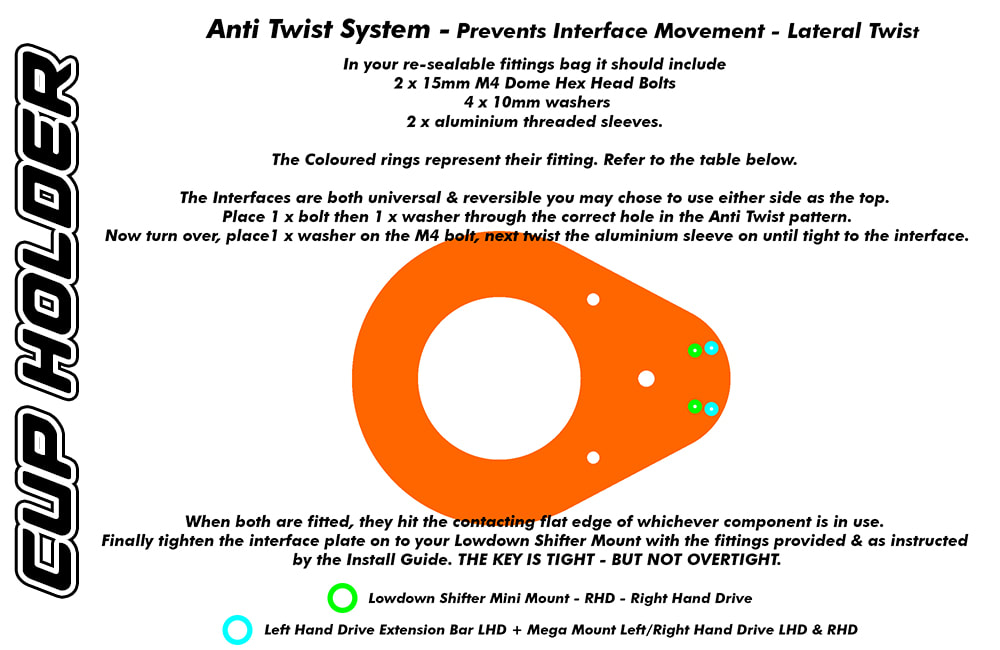
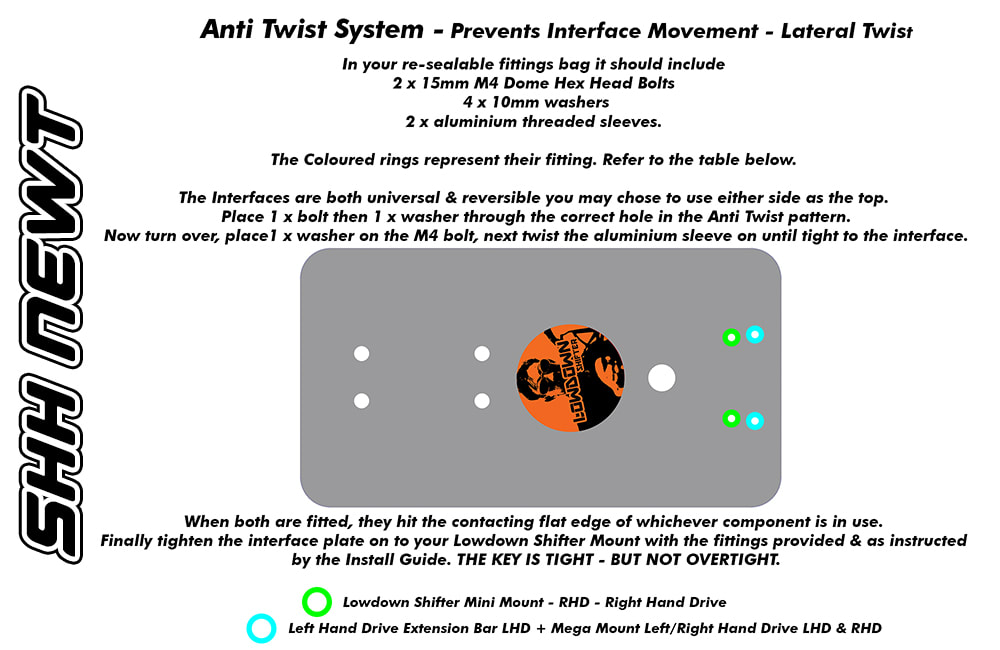
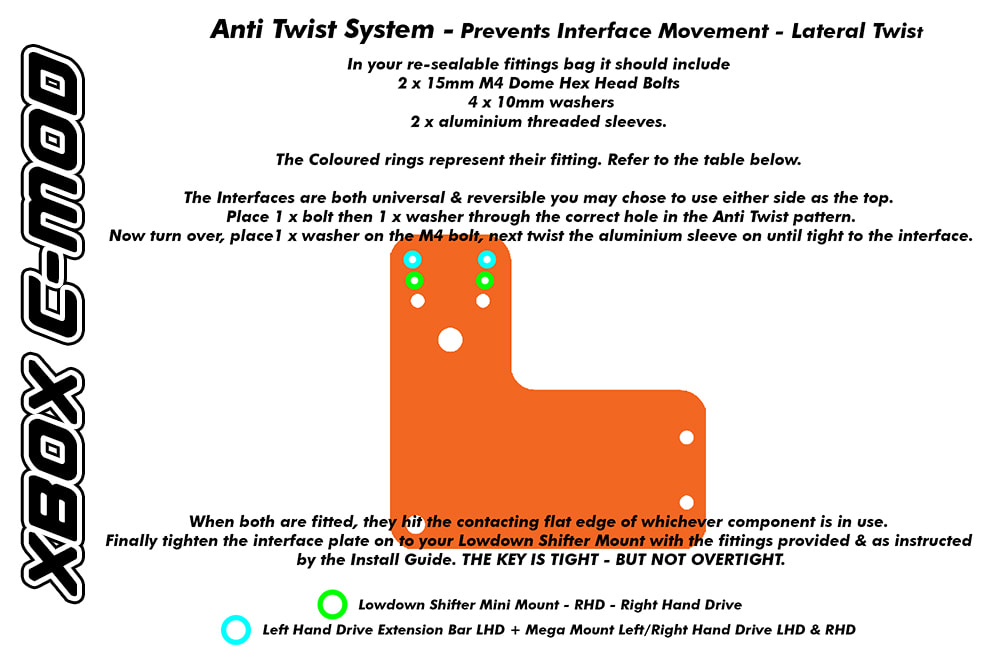
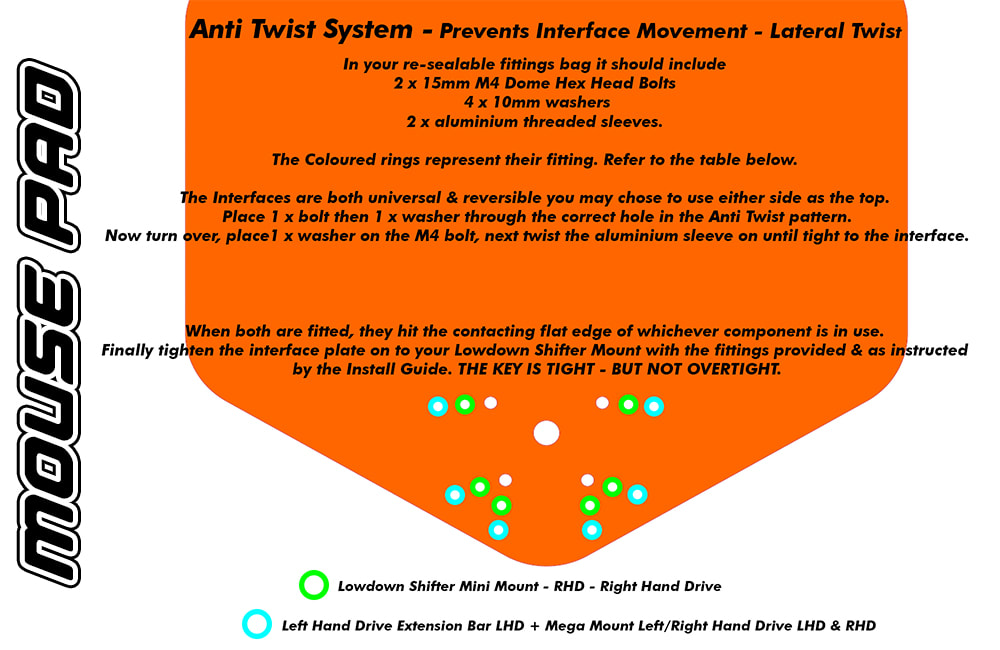
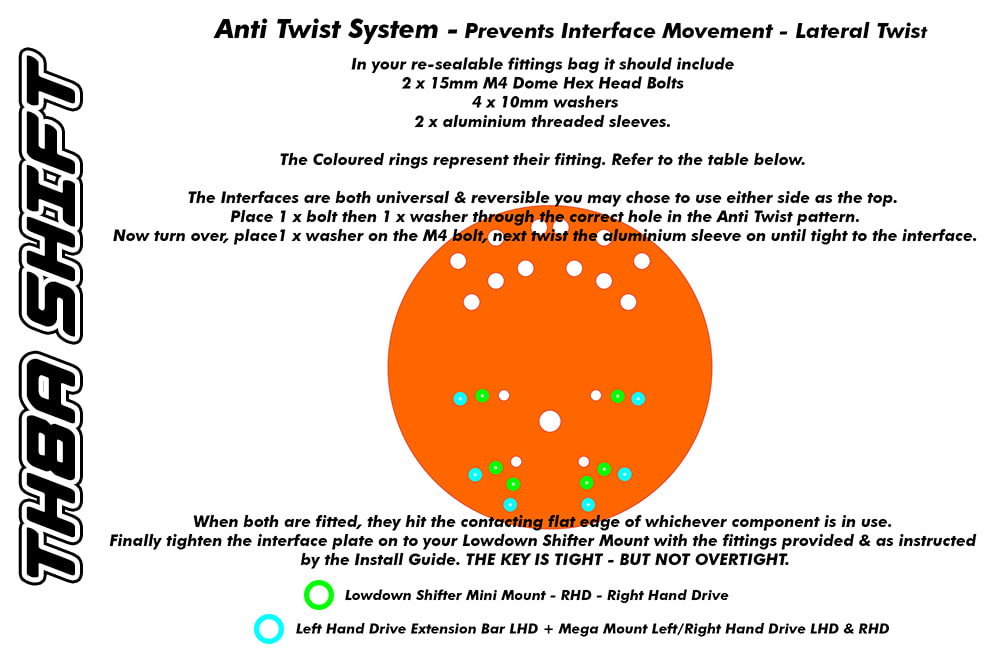
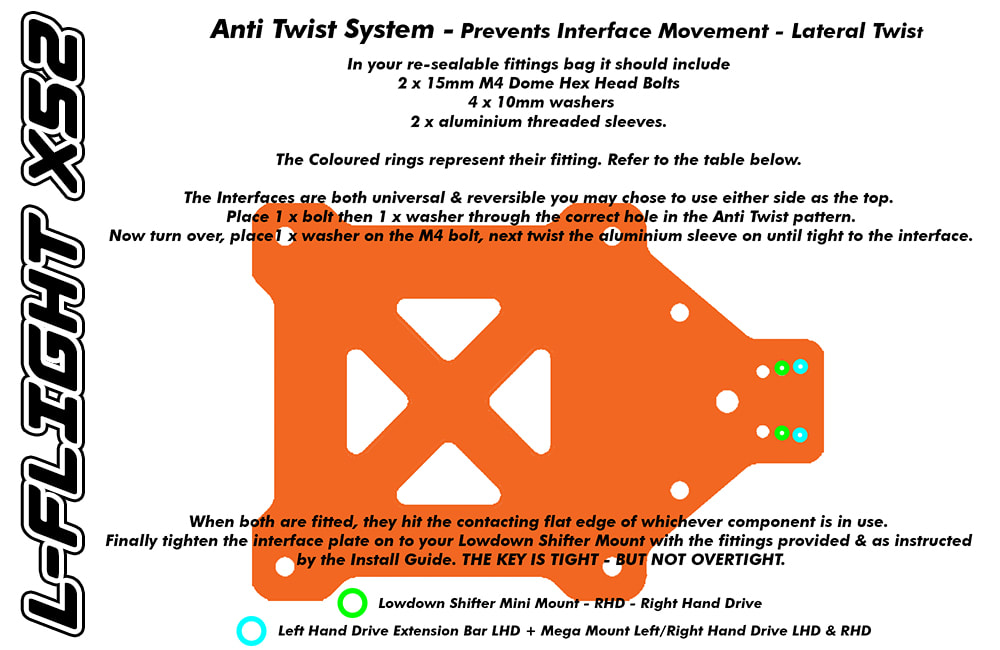
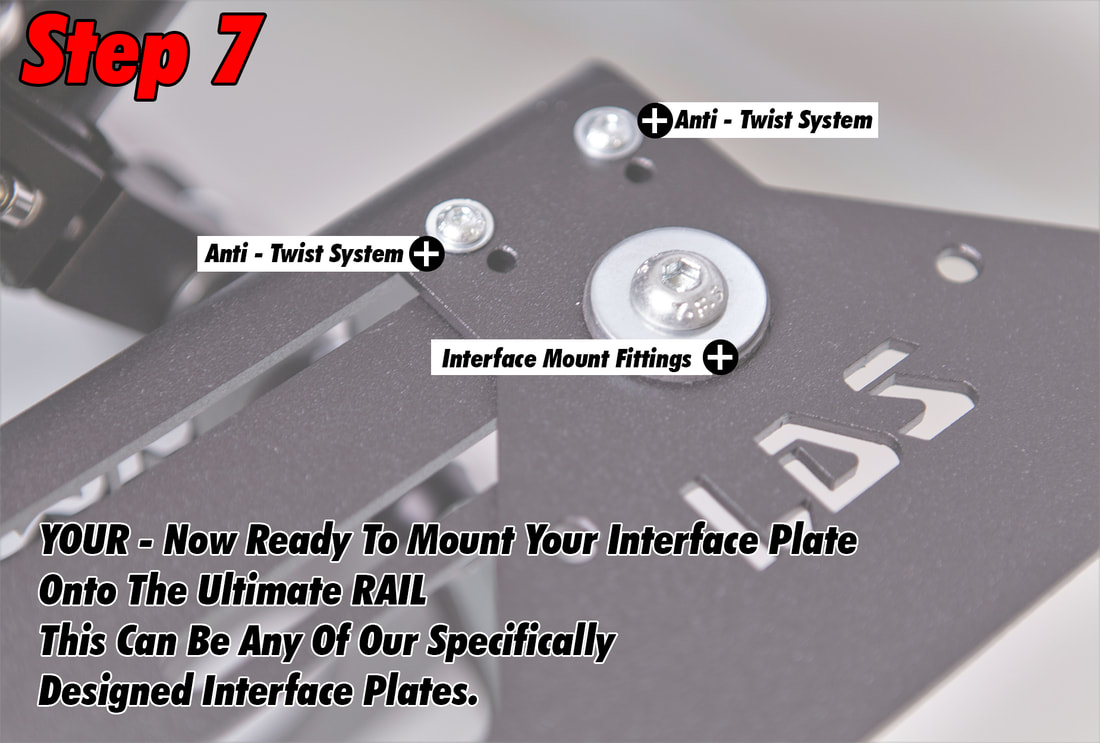
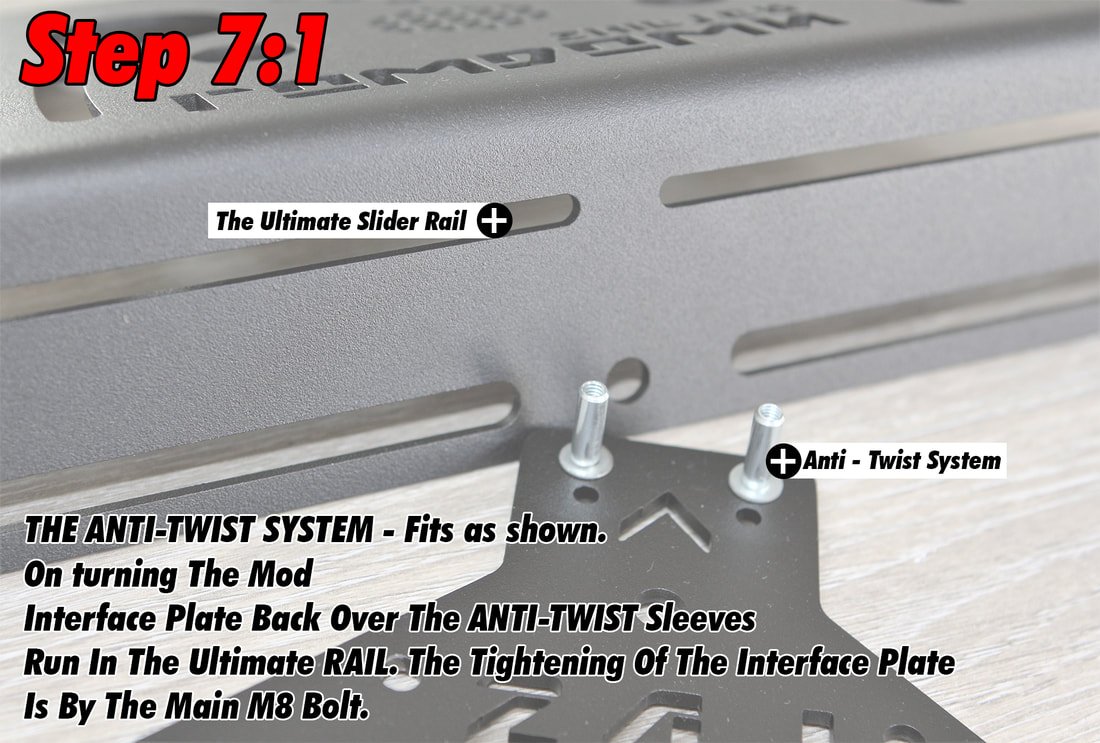
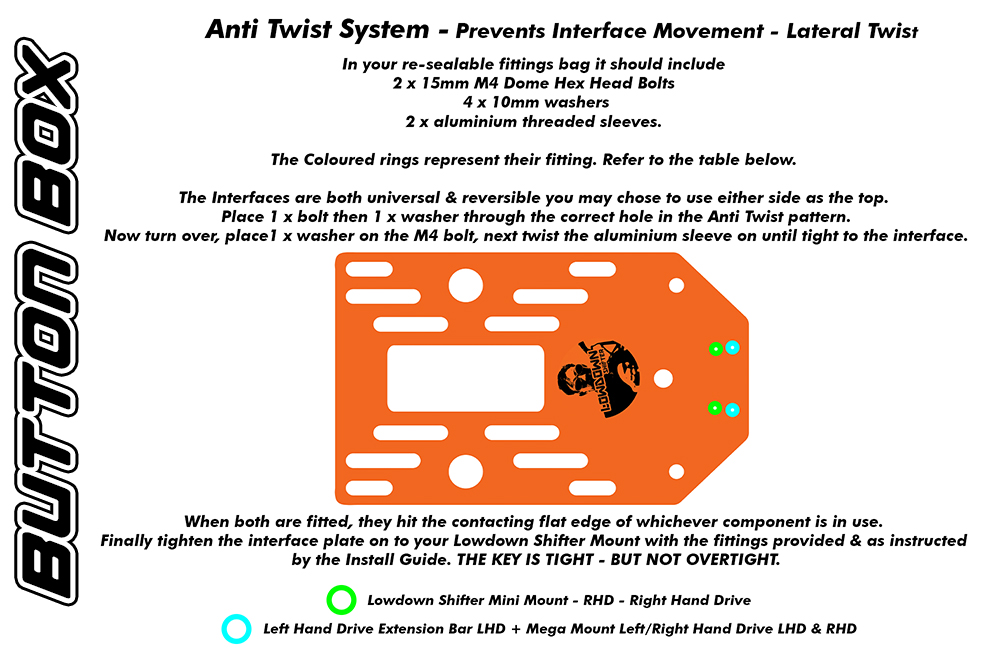
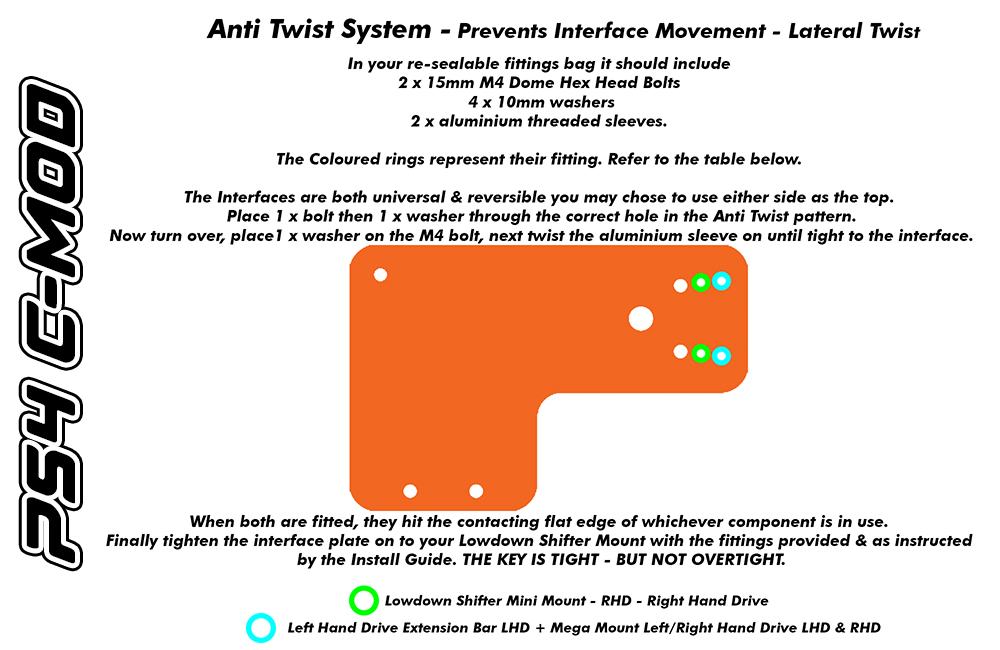
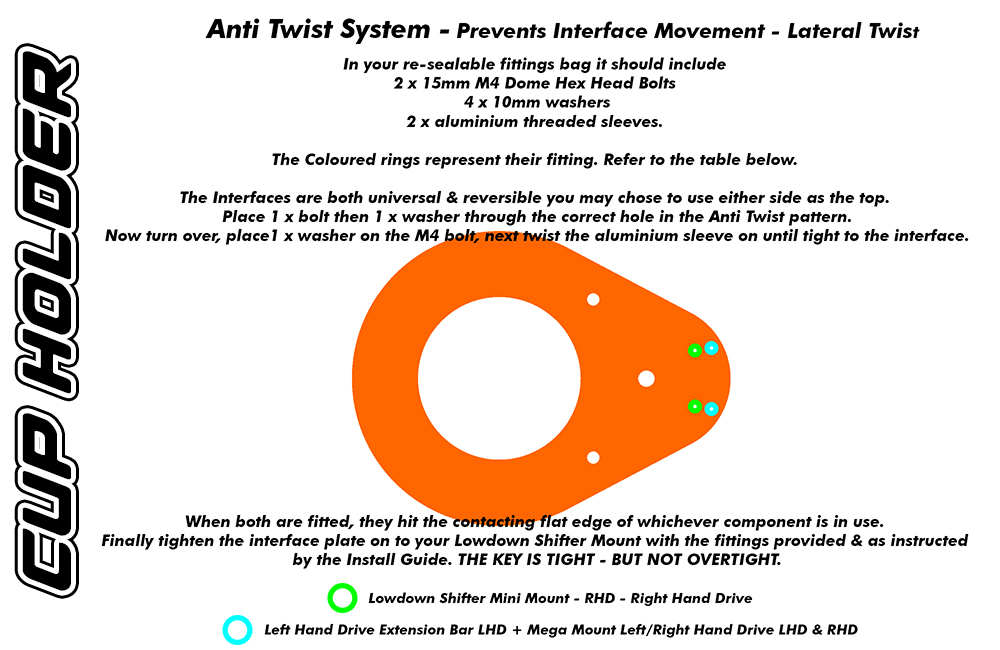
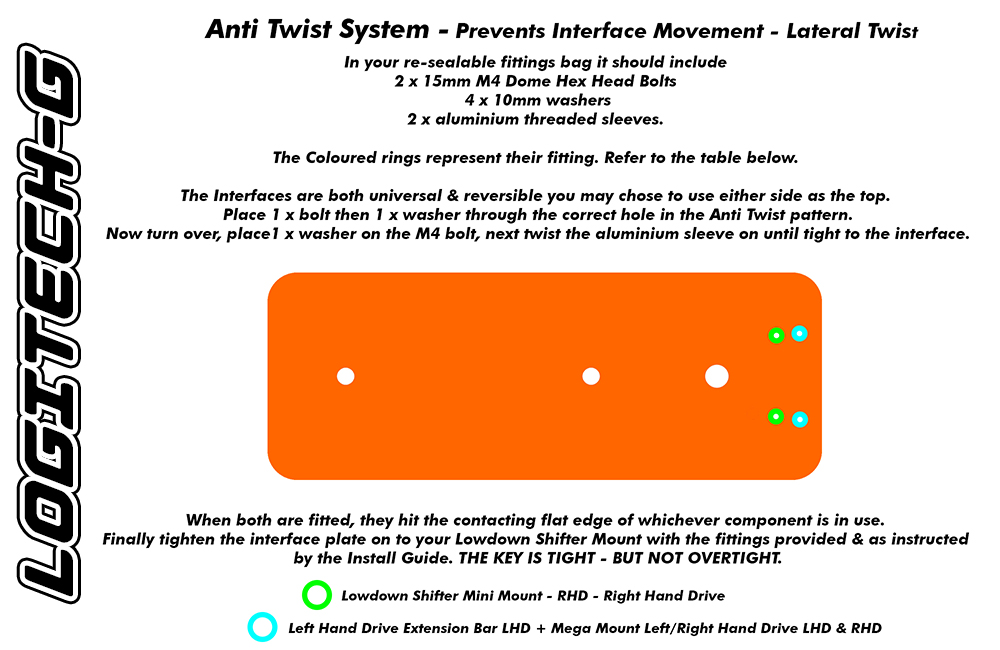
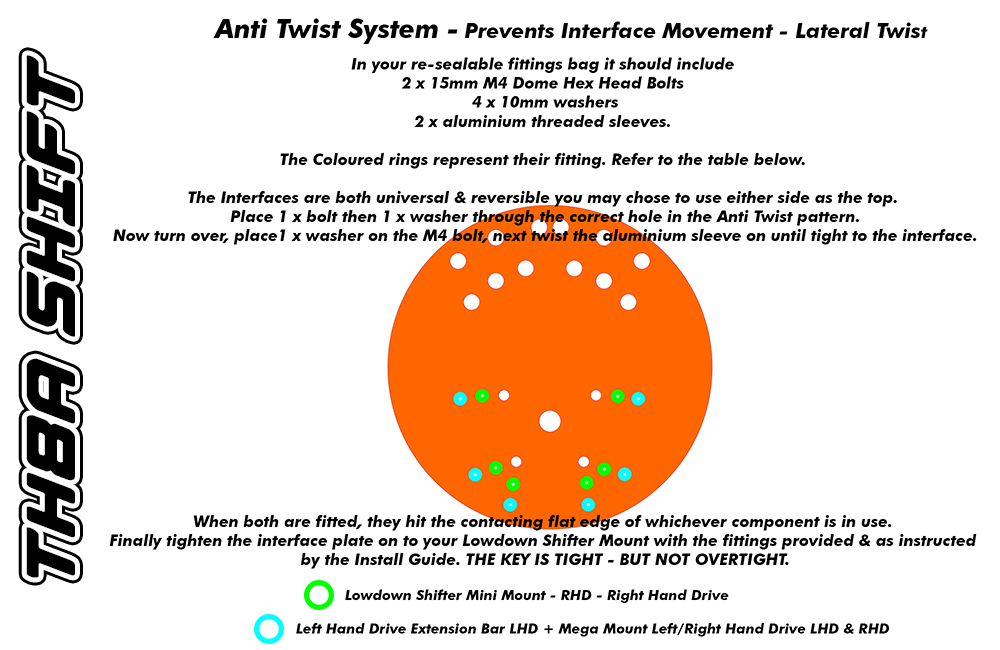
THE ANTI TWIST SYSTEM
Prevents Interface Movement - Lateral Twist


|

|

| ||||||||||||||||||||||||||||||||||||||||||||||||||||


|
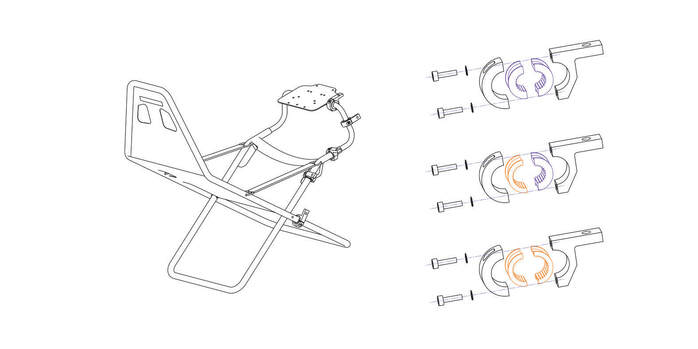
You will receive a re-sealable small fittings bag, the contents include 2 x 15mm M8 Hex Head Bolts
4 x washers & 2 x 15mm aluminium threaded sleeves. The COLOURED rings represent the fitting of the components and their locations. Our Interfaces are both universal & reversible you may chose to use the graphic, black or orange, or other as the top. Whichever suits. The fittings Placement, from whichever top you chose, has 4mm holes to suit these specific component - 1 x bolt then 1 x washer. |
You will use 2 holes in parallel.
Place through the correct hole in the Anti Twist pattern. When through, place 1 x washer then twist the aluminium sleeve on until tight on to the interface. These then meet the face of the Lowdown Shifter Mod Mount, preventing the twist of the Interface plate. Next tighten the main bolt and then onto applying your Mod by HARD MOUNT method. Always refer to the Install Guide, Advice & Fitting Instructions as instructed. |
"If anything EVER appears to come loose at anytime, just simply tighten, tweak your fittings back up"
(If you ever require spares or maybe a replacement, for whatever the reason, get in contact)
(If you ever require spares or maybe a replacement, for whatever the reason, get in contact)


|


